However, if you are using PSP as a companion editor for your favorite raw developer, you already know there are some tools that either won't work with raw images from anything other than PSP X6, or simply work better with images developed by PSP. (I'm thinking of the HDR tools, in particular) So there may be times when knowing how to get the best raw conversion from this tool will work to your advantage.

In spite of PSP X6's reputation for being weak as a raw developer, I have found that it is possible to get very good raw conversions from CRL, but only if you know what you are doing and are willing to accept the limitations built into the software. That sort of sounds like every other raw developer I've ever encountered!
With Corel PSP X6, you can do pretty much anything you can do with Lightroom or ACDSee Pro 7. However, it does it in a slightly different manner. And this has resulted in the erroneous belief that the Camera Raw Lab (CRL) component of PSP X6 is somehow 'not as good' as Lightroom or the other raw developers that practice "non destructive" editing.
CRL is as non destructive as any other raw developer. However, it limits itself to creating the best exposed image possible for the goals you have set for that image. Other edits in PSP are "destructive" in nature and require that you go into the editor for modification where you have an almost unlimited set of tools with which to work.
Is this less convenient than some of the tools found in the best of the Workflow software? Without a doubt. But it does have two advantages that might be important to you.
If you look at the training material for various plug-ins and third party tools, they pretty much all assume you are working with them as plug-ins in either Photoshop, PSP, or Serif PhotoPlus. (I use the Topaz family of plug-ins as an example) And the workflow suggestions for such titles as Topaz DeNoise, for example, tell you to do the noise control portion right after you set your exposure.
However, the plug-in workaround for Lightroom, and any other workflow tool has a less than adequate flow of work. The Plug-in tools that claim to work with workflow software do this by functioning as a stand-alone editor that can only work on tif or jpg files.
What this means is that you have to make the choice of either creating a tif or jpg file right after you set the exposure and give up the non destructive capabilities of your workflow tools; or, create the best image you can in your workflow tool, and only then create a tif or jpg file to do your sharpening and noise reduction. This is the exact scenario that Topaz tells you NOT to do for best results!
From my experience, noise reduction and setting sharpness with Topaz DeNoise 5 and Detail 3 is better if done right after setting exposure than it is by waiting until I have 'tweaked' every portion of the photo I can, and only then, creating the fixed tif file for the stand alone versions of the Topaz tools.
The OTHER advantage of performing your raw development with PSP X6 is that with its raw methodology, the level of "interactivity" between the Plug-in tools and the rest of your editing is much higher.
An Example Using PSP X6:
The obvious question is, do I use the software this way? And the answer is, I do not. For most of my photos, most of the time, I’m willing to make a compromise with accuracy and image quality in order to improve the speed and quality of my workflow. But on the other hand, if I run into a situation that requires The use of third party plug-ins (such as noise reduction), I think I have one more tool available to me that many other people do not.
An Example Using PSP X6:
- You develop your exposure settings with CRL and send the image to the PSP X6 editor.
- You immediately set your sharpness and Noise reduction with your Topaz Plug-in tools.
- You crop, adjust color, perform selective sharpening, and any other edits you feel is appropriate
- You notice that the subsequent editing has altered the appearance of noise and sharpness, and it requires further tweaking.
- You invoke again your Topaz plug-in tools,and tweak the sharpness and noise control.
- If THAT changes the effect of any other setting you can tweak that setting as you feel appropriate.
- You create your first jpg or tif file for that image.
- You develop your exposure settings with your favorite raw developer
- You either adjust the sharpness (and possible noise reduction) with the built in raw developer tools.
- You crop, adjust color, perform selective sharpening, and any other edits you feel is appropriate.
- You create a tif file (or jpg if you prefer) and send it to the Topaz plug-in tools functioning as a standalone editor.
- You immediately set your sharpness and Noise reduction with those tools.
- If tweaking of other edits is required, then you need to exit Topaz, return control to the raw developer, and either edit the tif altered by Topaz or the original raw image and start the 'non destructive' editing cycle all over again.
The obvious question is, do I use the software this way? And the answer is, I do not. For most of my photos, most of the time, I’m willing to make a compromise with accuracy and image quality in order to improve the speed and quality of my workflow. But on the other hand, if I run into a situation that requires The use of third party plug-ins (such as noise reduction), I think I have one more tool available to me that many other people do not.
I'm willing to bet, however, that many of us have never even considered the effect of third party plug-in tools to our overall workflow. I personally don't care how you set up your workflow, you have to do whatever works for you.
I would though, like you to have enough information to make an intelligent choice on when to use CRL. That way, it will be there for when you need it and you will be able to use it effectively when you need to.
Using PSP X6’s Camera Raw Lab
The Controls
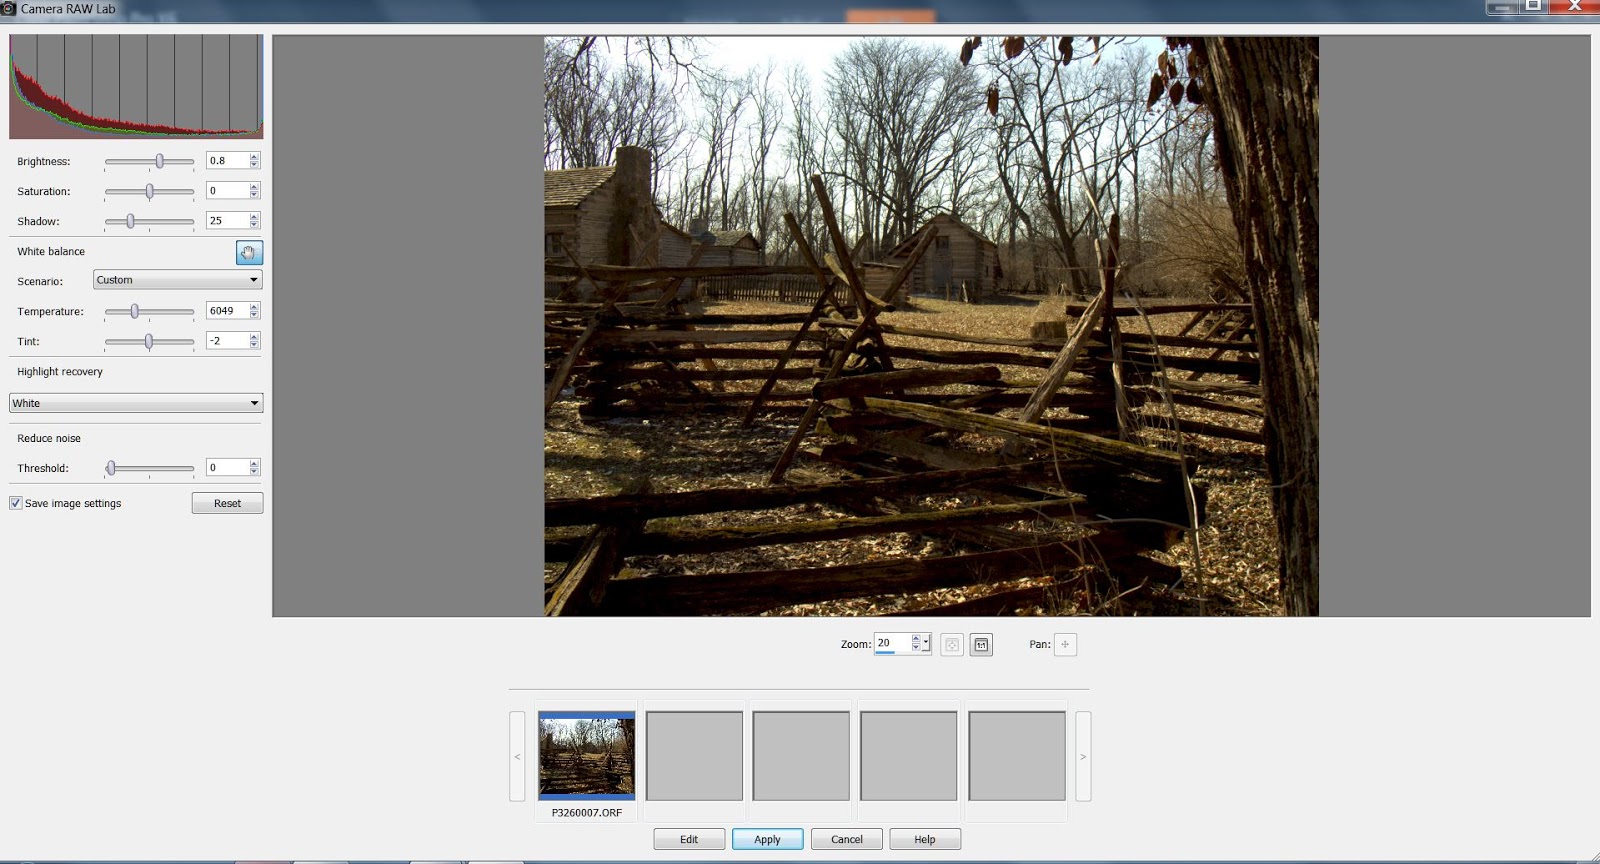
The Histogram
- The left portion of the histogram describes graphically how much of the photo is in the shadows.
- The right portion of the histogram describes graphically how much of the photo is in the highlights.
- The center portion of the histogram describes graphically how much of the photo lies within the mid tones.
The graph in the Histogram Adjustment dialog box displays the number of pixels for each value of the selected color channel. The vertical axis represents the number of pixels and ranges from zero to the highest number of pixels for each channel in the graph. The horizontal axis represents the value of the selected channel, from 0 to 255. Note that as the controls change, the histogram changes as well. This allows you to better understand the complex relationship between light and dark without letting the emotional, artistic content misdirect your attention.
The Exposure Controls
Brightness
The Brightness slider control is not difficult to understand. The image gets darker when you slide the control to the left, and gets brighter when you slide the control to the right.
However, watch the live histogram control as you slide the brightness control about. As you slide the control to the left, the curves become a little bit taller, skinnier, and more compressed to the left. When you slide the control to the right, the curves become a tiny bit shorter, a bit more spread out, and seem to drift to the right.
While each photo is different, certain things remain generally true. As the shadows become more prominent a larger number of pixels are contributing to the number of pixels sitting on the left, and fewer pixels contribute to the highlights as they are pushed to the area representing the mid-range tones. And some of the mid-range tones are pushed into the shadows. Because it is relatively easy to darken a pixel, it is relatively easy to squeeze a lot of the pixels in your photo closer to the left edge of the histogram.
As the highlights become more prominent, pixels contributing to the lightest shadows start to drift to the center of the histogram, while the lightest mid-tones and highlights are pushed closer to the right edge of the histogram. Because there are usually fewer highlights in many photos the darkest shadows tend to anchor the left edge of the curve and as a result, when brightening, the curve tends to stretch its way to the right rather than moving everything to the edge the way the darkening does.
Saturation
This control is similar to brightness but deals with color purity, instead. When you slide the saturation control to the left, the colors seem to go away, when you slide the control to the right, the colors becomes deeper. In a photo there are 3 colors that combine to make all the other colors. Red, Green, and Blue. If there are a lot of pixels in a given primary color, the curve for that color channel will be tall in the histogram. Each color channel has a value from 0 to 255.
A value of zero means the all the color for a given color color channel has been reduced to nothing, so the histogram curve for that color gets skinnier. When set to zero, the curve doesn't go away because the pixels set to zero are still designated as belonging to one of the 3 primary colors. they just happen to be set to zero. So while you will see a skinnier histogram curve for that color, you won’t see it go away completely.
A value of 255 for a given color means that as much of that color has been added as possible, and the curve for that color gets fatter.
Changing the saturation value of a primary color won’t change the number of pixels assigned to a given color, it will just change the level of saturation, so the height of the histogram curves remain the same while the width of the curve changes.
Time for a little experiment! Go back and change the brightness slider again! Notice how the height of the color curves change. Can you figure out why? Well the brightness control changes the luminance of the pixels. By brightening or darkening those pixels we drive some of them into the odd behavior of not acting like a primary color, just one of lightness and darkness. Fortunately the raw infrastructure is keeping track of what color they are supposed to be, so we can add the color back if we had to.
Shadow
Do not make the mistake of thinking that the Shadow control is a poorly named 'contrast' control, it is not. Instead, what it does is, by sliding the Shadow control to the right, you darken the shadows. Then gradually, you begin to darken the mid tones as the control slides further to the right. But note that at no time, does the shadow control seem to affect the highlights. A true contrast control would attempt to accentuate the differences between all the various shades of highlights, rather than just one end.
Now this can often serve to create a bit of an illusion that contrast has increased, but the ability to ignore the highlights adds an interesting twist to the usual grouping of the Brightness, Saturation, & Contrast controls found in many exposure panels.
If you want to actually control the contrast you can, but not at this point. This is a true exposure control aimed at the shadows. It allows you to set the Exposure value (EV) for the shadows independently of the overall EV set by the brightness control.
If you want to actually control the contrast you can, but not at this point. This is a true exposure control aimed at the shadows. It allows you to set the Exposure value (EV) for the shadows independently of the overall EV set by the brightness control.
White Balance
As the name implies this control adjusts how colors are set to control how white would display in the photo. In other words, would the white object appear as a pure white, or would they be shaded in someway towards another color? Any more, white balance is controlled so well by the camera so that whites almost always appear white. But sometimes they make a mistake, or we want a special effect. So it helps to understand what the white balance is doing.
The Eye Dropper control
The Eye Dropper control
This is one of the little mysteries of PSP's Camera Raw lab. Just WHAT does this thing do? The help file doesn't even mention it. After some experimentation, I have a pretty reasonable guess. If you select either a White, Black, or Gray pixel with the eyedropper, you can adjust the White balance by removing any tint, or color shading, from that pixel by adjusting the color balance of the entire photo.
While this kinda, sorta works, I just don't see how this is superior to setting one of the White balance presets in the Scenario control and then adjusting the sliders to taste. Though in all honesty, Most cameras do a pretty good job of setting the white balance automatically.
While this kinda, sorta works, I just don't see how this is superior to setting one of the White balance presets in the Scenario control and then adjusting the sliders to taste. Though in all honesty, Most cameras do a pretty good job of setting the white balance automatically.
Highlight Recovery
Highlight Recovery is a tool of presets that control how highlights are to be presented. There are 5 settings, they are:
Highlight Recovery is a tool of presets that control how highlights are to be presented. There are 5 settings, they are:
- None
- Normal
- White
- Balanced
- Color
What appears to be happening, is that each preset darkens just the highlights according to a preset standard set by Corel. But each preset seems to consider different levels of brightness as the desired minimum level. So while the saturation and other exposure values, along with the white balance values don't change, the histogram shifts a bit to accommodate the change in highlight values. This, of course, changes the look and feel of the photo overall.
Reduce Noise
Even though the slider control in the "Reduce Noise" section is actually labeled "Threshold", I don't believe this is a true, traditional, threshold control.
The term, "Threshold" implies that the difference in luminance (or some other quality) between two closely placed pixels must be greater than the threshold level set before any action can be taken on them. This does not appear to be happening in this case.
Instead this appears to be a simple noise control that merely progressively smears the image the more you slide the control to the right.
This is clearly the weakest control in CRL. I suggest that you leave this control set to zero, and either wait to perform your noise control in PSP's bit mapped editor, or use a third party noise control plug-in once you get to the editor.
I see no value in this control what so ever. Corel should either bring it up to the standard set by noise control found in other software, or drop it completely. Beginners will just smear their work beyond all repair otherwise.
I suspect this control is the cause of much of PSP's reputation for not being a good raw developer.
I suspect this control is the cause of much of PSP's reputation for not being a good raw developer.
Image Selection Strip
At the bottom of the CRL window is a section where strip of images will allow you to work on several images in a sequential manner, but allows you to flip back and forth between images so you can create a similar look and feel among the images.
To use this control, you don't need to be using the PSP X6 "Manage" Tab (the built-in organizer/browser). You can select the images the images in any browser (that I know of!) that can invoke an external editor and select PSP X6 as your editor. I tested this with ACDSee Pro.
All of the photos will be sent to CRL and reside in the image strip. You can make the changes sequentially for each photo and make sure they all look the way you want.
The "Apply" button will apply the changes to the images, and send control back to your organizer.
The "Edit" button send the all images, with changes, to the PSP X6 editor at the same time. You need to show some restraint, however, since image files straight from the camera, are getting larger and larger. And it will be relatively easy to send too many photos to the editor at the same time and cause resource problems not only with PSP X6, but your computer as well. Your resources are FINITE, so a little common sense might be required here!
In Summary
This is a pretty good tool once you take some time to understand how it works and how it is designed to fit into your workflow. It is good enough for a beginner with raw to get started inexpensively and still turn out good work.
And for the rest of us, it is one more tool to be used from time to time when appropriate. It is not something to be avoided or dis-respected. It does what it was designed to do very well.
No comments:
Post a Comment