The mid tones are relatively easy to display. In most photos, they do the lion's share of work at informing the viewer of what the photo is all about.
 |
| Taken with the m43s camera Olympus OMD E-M10 |
With the highlights, we want to see the things we can see with our eyes. We want to see the complicated textures of well lit, light colored things, not the white glare of a solid block of white.
Unfortunately, not every camera is capable of recording an extremely wide distance between the blackest blacks and the whitest whites. We see endless arguments in various Photography internet sites about which cameras and which sensors have the widest dynamic range (DR) and if one needs to sacrifice the shadows for the highlights or the highlights for the shadows.
But as I grow as a photographer, I am learning that even if a given camera does not have the absolute widest DR possible, most photographers are not really doing the things necessary to take advantage of the dynamic range available to them.
Best Practices for Maximum Dynamic Range
Listed below are some things you can do to maximize DR in your photos with the camera you have:- Learn to properly expose an image. True, minor exposure errors can be fixed with your photo editor, but those sort of corrections frequently cause us to compromise our ability to display all of the detail available to us at one end of the lighting spectrum in order to preserve detail at the other end of the lighting spectrum. A good, and appropriate exposure will help you display detail at both ends of the lighting range.
- Learn your camera and other gear well enough to know if that camera and gear tends to over or under expose when auto exposure is used. For instance, if you know your camera's auto exposure tends to over expose by 1/3 of an f-stop, then learn how to set your camera so that it sets the aperture to 1/3 of a stop less than the light meter says it should be. Generally, simple testing can identify this sort of discrepancy. And it is not at all unusual even in the best of gear.
- When DR is important, shoot raw and not jpg images. Most camera raw formats have the ability to concurrently record an Exposure Value range, at the very least, of an EV of -3 to a +3. (At its simplest, an EV is a single number that represents a certain amount of luminance based on shutter speed and aperture. The f/stop and shutter speed of two photos could be at different settings, but if the same amount of light overall, hits the sensor on both photos, they have the same EV number. So a range of -2 to +2 means that you can darken or lighten the photo to 2 stops higher or lower without significantly losing any detail.) Jpg images, in effect, only records a single EV setting, So making a photo darker or lighter WILL affect the available detail. This is an EXTREMELY simplified explanation, if you are curious, a simple internet search will yield much more information on this issue.
- Learn to develop (i.e. edit) your raw images to their fullest effect. We use the term "develop" to differentiate what we do to raw images to what we do to jpg and tiff images.
It is this last thing that is the point of this article. I intend to illustrate how a specific raw development tool in ACDSee Pro 8 and the identical raw tools in ACDSee Ultimate 8 can be used to wring out all the Dynamic Range your camera can provide you.
Light EQ
This specific tool is called the Light EQ. It is a subset of the Lighting control.
What it does is it allows you to divide the raw or bit mapped photo up into 2, 3, 5, 7, or 9 different lighting zones (ACDSee calls them 'Bands') and adjust the exposure for each of those zones separately. This works best with raw photos, but can help with jpg and Tif files quite a bit.
I normally just leave it at 9 separate bands unless I find that I want to treat larger areas than would be provided for with 9 bands.
You will notice that the control as displayed, has 18 vertical sliders separated by a graph. These 18 sliders represent the 9 bands that we have set this control to use.
The top 9 sliders control brightening, while the lower 9 sliders control darkening. Sliding the top controls upward brightens that part of the image that zone slider represents. Conversely, sliding the lower zone sliders, towards the bottom of the screen darkens that part of the image that zone slider represents.
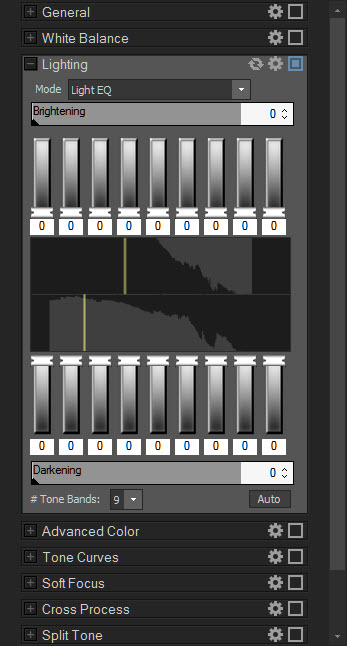
Directly above and below the vertical sliders are two horizontal sliders called "Brightening" and "Darkening". These controls move all the sliders according to a specific curve. I rarely use this unless I am looking for a specific and unusual 'look' to the image. I personally prefer to adjust each slider separately. I like the detailed control that gives me.
Between the two sets of vertical sliders is a graph that represents the default lighting of the photo you are working on. Again, the top half is for brightening and the lower half is for Darkening. I have learned from using it every day, that any slider that doesn't sit directly above or below a light gray area of the graph, will NOT change anything in the image, while any slider that does sit directly above or below the gray area WILL affect how the image looks.
For example, in the screen shot of the control above, neither the top or bottom sliders of band 1 (numbering from left to right) are above or below the gray area. Neither vertical slider will do anything to the image. However, both of the sliders that represent band 6 are above and below the gray area. Therefore, that band could be either lightened or darkened. On the other hand, band 8's brightening slider is above the gray, but it's darkening slider does not sit bleow the gray. That means it can only be brightened.
Ideally, all 9 bands would sit above and below the gray of the chart, maximising the ability to lighten or darken all 9 bands, but I have never seen that situation occur. Usually that chart skews either to the right or the left. I consider the image represented by the screen print of the control pretty good. everything sits roughly in the middle of the chart which means I can lighten and darken the image with a high degree of flexibility.
An Editing Session That Uses the Lighting EQ
Consider this image:


Above, I think the foliage is a little flat and the tree in the center could use some more texture. The flagstones in the path have some detail, but I think they could use more. I also think the photo needs to be cropped for the best effect.

Above, after I adjusted the exposure controls, things look a little better. The foliage is no longer flat and lifeless, but the tree and the flagstones could still need more detail and texture. It still needs cropping.

Above, NOW the image is starting to look good! Note how I adjusted the Lighting EQ sliders so that now the flagstones have plenty of detail as does the tree. Also note the position of the sliders that represent band 8, Even though the darkening slider doesn't sit directly under the gray area, it overlaps the gray of the chart a bit, so moving it does affect the image somewhat.
I didn't choose to move this slider. Instead, I used an alternative method of putting the mouse cursor over an area of the image (I believe it was the flagstones), right clicked the mouse and drug the mouse cursor down until that area darkened to the level I wanted it. In that situation, the software selects the sliders to move for you so that the area you select will be properly affected.
When you do this, remember that the zones (Bands) are delineated by relative brightness of the original image. So the areas of a given zone don't have to be contiguous. In the beginning, it is easy to forget this and pay attention only to an area of the photo you are most concerned about. You need to look at the other areas of the photo to make sure the zone you are working on didn't change THEM.
Below, the completed photo after cropping, noise reduction, sharpening, Fixing Chromatic Aberration, and adding a post crop vignette.

