Translate

Thursday, December 22, 2016

HDR Utilities Compared

Photomatix Pro 5.1 vs Affinity HDR vs PSP X8 HDR

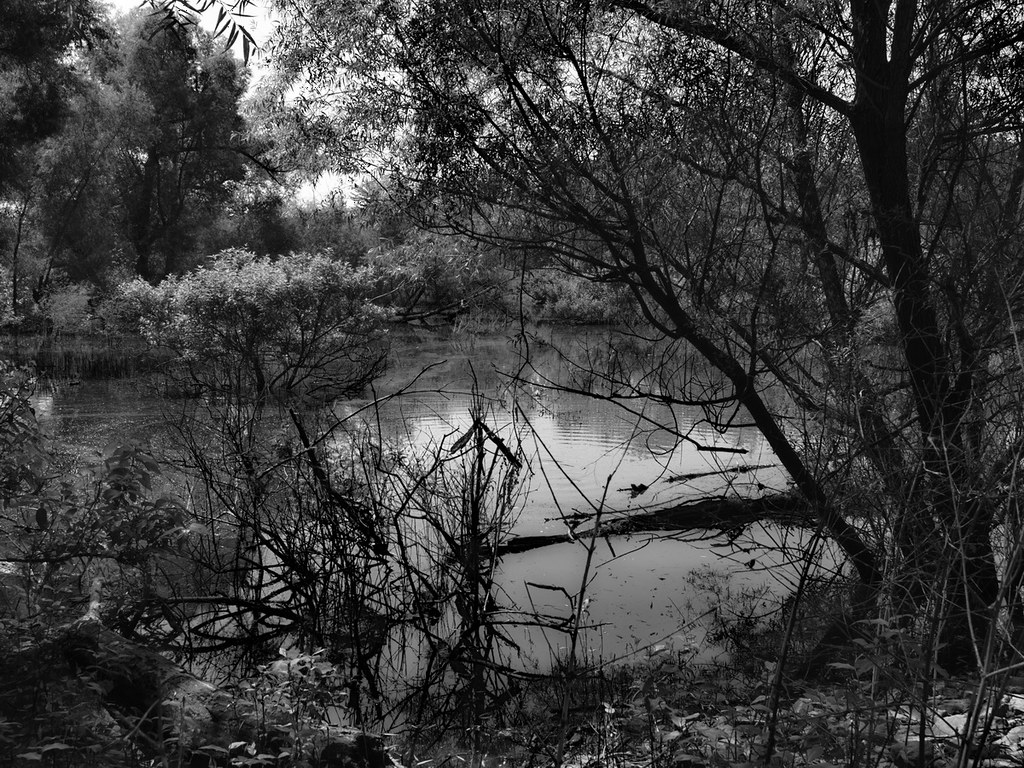
Produced with Photomatix Pro 5.1
This looks very much how I remember the scene.
click on the image to see a larger version
There is an inherent unfairness in these sort of 'shootout' type articles that I don't really know how to overcome completely.  

  • The person doing the comparisons, generally knows one product better than the others, so the final product of the less well known products always suffer.
  • The person doing the comparisons, generally has one of the products successfully incorporated into their post production workflow, and runs the risk of just complaining that the other products aren't the favored products.  I've seen it happen in other reviews, and I really hate that!
  • The person doing the comparisons, generally brings a whole host of other unstated assumptions and prejudices to the table that can complicate and shade his or her evaluation, but that the reader can only guess at.
Be advised that I am aware of these shortcomings in myself and have worked hard to overcome them.  While I can't get rid of them completely, I think I have kept them under some level of control!

My favorite HDR photos are the more subtle more naturalistic photos, and not the 'over the top' tonemapped photos.  Don't get me wrong, I do the other sort too; but I think modern HDR software makes it so easy to get those sort of Dramatic, 'kitschy' photos, that I think a test to produce more natural looking photos gives the HDR software a more thorough work out.  I TRIED to get the final output from all three to look as much alike as I could.  I was only modestly successful

Photomatix Pro 5.1

A screen shot of Photomatix 5.1
click on the image to see a larger version
To be honest this was, and is still, my favorite.  I love the level of control it offers and it allows me to produce almost any sort of HDR photo I want.  But most importantly, it fits into my ACDSee centric PP workflow almost seamlessly.

All three HDR utilities will work with raw images, but Photomatix 5.1 also allows me to select a series of exposures in ACDSee, right click on the group and send them to Photomatix 5.1 for processing.  This alone is a time saver for me.  I will explain how the other two don't work as well in their respective sections.

It has a high degree of control in how it processes raw, a high degree of control in how it processes the merged photos, and a nice selection of color, tonality, and sharpening tools after the merged photo has been finalized.  It is frequently possible to get to a finished product with JUST Photomatix 5.1 without any further editing in ACDSee Ultimate 10 or any other bit mapped editor.

Photomatix 5.1 comes with canned presets and allows the user to create his or her own presets as well.

The sample finished photo looks pretty much how I remember the scene when I took it.

Corel PaintShop Pro X8 HDR Utility


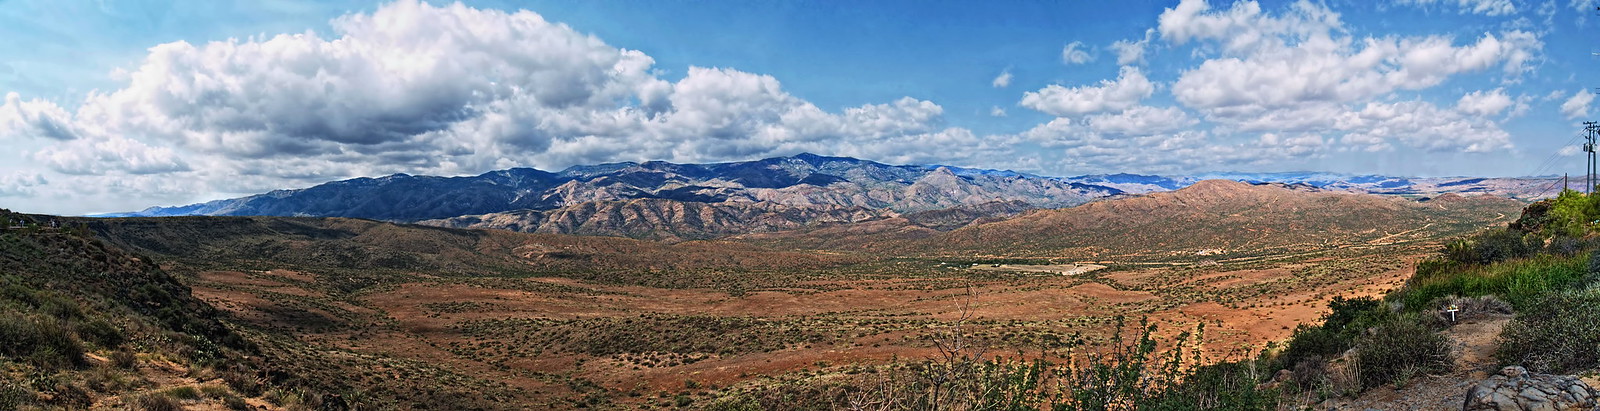
Produced with PaintShop Pro X8 HDR Utility.
I particularly liked how the water looks in this version.
click on the image to see a larger version

This was my first HDR utility, and it is surprisingly good. It's biggest drawback for me is that while I can select a series of exposures for processing and send them to PSP from ACDSee, I can't send them to the HDR utility.  

I end up sending them to the Corel Raw Lab utility (the PSP Raw developer) if they are raw images, or to the PSP editor directly if they are tif or jpg images.  To use the Corel PSP HDR utility, I have to find and select the images from the very basic, built in, PSP organizer.

A screen shot of PSP X8's HDR Utility
Click on the image to see a larger version.
I think if Corel wants to remain competitive with PSP, one of the things it needs to do is alter their HDR utility to accept raw images from any source, not just the PSP organizer or Aftershot Pro, which I believe also comes with the HDR Utility.  

Software publishers seem to be terribly short sighted when it comes to doing things that might attract new users, so I don't expect this to happen!  But hey! you never know with certainty!

What I like about PSP's HDR utility is that it sort of shows you what it is doing every step of the way and allows you some input in how each step occurs.  The other two products, in an effort to make thing easy, kind of take automation further and you don't really get to see the 'sausage being made'!

It comes with a few standard presets and allows you to create your own.  But when I upgraded from PSP X6 to X8, I don't recall any effort to bring my saved presets over from X6.  (I haven't upgraded the other two to a new version, so I don't know if they are any better in that regard.)

Single Raw Photo, produced with
PaintShop Pro X6 HDR Utility
click on the image to see a larger version
Another thing I REALLY like, is the Single Raw Photo option in the PSP X8 HDR utility.  It literally creates 3 separate exposures from a single raw photo, and merges them as if they came from a series of three separate photos.  As near as I can tell, Photomatix 5.1 just does tone mapping to a single raw image, I don't think it is creating multiple exposures from the raw and merging them.  

The increased tonality capability of PSP's Single Raw Photo HDR utility is pretty amazing, and can match, if not occasionally, beat, ACDSee's Light EQ tool for squeezing out all the dynamic range a raw photo can offer.  

Yes, the user interface can be a bit intimidating, especially to a newbie, there are a lot of options you won't see in other HDR utilities.  But it isn't something the reasonably intelligent digital photographer can't get comfortable with in an hour's worth of practice.  I consider it a useful tool in my toolbox.

Affinity HDR Utility


Affinity is getting all the buzz and chatter right now, especially since, from what I've read, the OnOne raw product seems somewhat disappointing to many people who were looking forward to seeing the production version (at least the buzz and chatter seems more negative, I haven't tried it), and everyone always seems to want to take Adobe Photoshop down a bit.  

Affinity's raw development leaves a lot to be desired, but it's bit mapped editor is fairly good, though still a bit buggy.  The Affinity HDR module which needs elements of both seems to reflect this disjointed level of completeness, in my mind.

In many ways Affinity gets many HDR things right, and certainly, it is the only HDR utility of the three that offers a Curves tool for controlling tonality.  

It's a pretty automated process, and that makes it VERY easy to create HDR photos.  It also has the ability to use and create presets.

The problem is, I can't tell if the controls are a part of the post merge, pre finalization step or are just the standard bit mapped controls showing up to do THEIR thing!

It also can't accept a series of raw files from ACDSee and process them as HDR.  They go automatically to the raw develop persona as multiple instances of the persona, and I can't figure out how to get them to the HDR input window without going through the very primitive, standard Windows open file popup window.

Produced with Affinity Photo's HDR Utility
click on the image to see a larger version
To the good, once you get past the Windows selection popup window, creating HDRs is incredibly easy, and the output looks pretty good.  I don't think it is as good as Photomatix or Paintshop pro, but it is a whole lot easier to produce.

My suspicion is that Serif (the software developer and publisher of Affinity photo), sees the HDR utility as something that is designed to produce a fairly decent HDR exposure that you can finish up in the Affinity Photo bit mapped editor.  That is as valid an approach as Photomatix's "do as much as possible inside Photomatix" approach, I think since the Affinity Photo bit mapped editor is so complete. But I do think it complicates things for people trying to do product comparisons!

My Conclusions

I would rate the output of this test to be:
  1. Photomatix Pro 5.1
  2. Corel PaintShop Pro X8
  3. Serif's Affinity Photo 1.5
Photomatix Pro 5.1 works well for me and fits well within my normal workflow. I can do HDR quickly and easily with an ACDSee/Photomatix combination.  PSP X8's HDR utility while not as convenient to use as Photomatix, offers me a different approach to HDR that I like to have available.

Affinity's HDR module is not likely something I will use much.  While it is really easy to use, and produces fairly good results, I don't think it offers me, who is about to make the transition from a beginner HDR creator to an intermediate HDR creator, much that the other two products don't offer in better, more efficient ways.  It would be good for people who want to explore HDR without spending much money though.

I don't see this as a negative about Affinity Photo, overall.  It is a remarkable product in many ways, though it has a long way to go before it can offer PSP or Photoshop any serious competition.  I'm glad I purchased Affinity Photo, and I look forward to using its non HDR functions in the future, especially as Serif brings it up to a tested ready state.

Thursday, December 1, 2016

Win 10 Alternatives to ExifToolGui

[UPDATE12/2/2016]  I have to withdraw my support for PhotoME and instead will now use ExifPilot for my Gui based exif editing.  I have discovered, one day after publishing this article that I am unable to export data from my ORF files  to other files.  The export/import capabilities of PhotoME are primitive and incomplete at best.  I have changed this article to reflect this. My apologies to any who this inconvenienced. [END UPDATE]

Embedded metadata in a photo is pretty important.  Most people want, at the very least, their name and copyright information embedded in the photo.  They want the camera, lens, and exposure information embedded within the photo.

Many photo managers, like ACDSee and Lightroom, allow one to search on that information, so it makes finding very specific types of photos pretty easy.

The problem is, many photo editors strip all or some of the exif data from the photos when they save it. This is particularly true when you send photos to the editor on a 'round trip' from a photo manager.  (Yeah, I'm looking at YOU PaintShop Pro!).

So a very common need is to copy the metadata found in the source photo (such as the raw or the Out of camera jpg) to the completed photo that comes back from the editor.

And that's where ExifTool comes in.  It is an Open Source library of  commands written by Phil Harvey, that allow other programs to manipulate, add, change, and delete embedded metadata such as the Exif and IPTC data that the file format you are using allows.  You can learn more and download Exiftool at this website: http://owl.phy.queensu.ca/~phil/exiftool/

The problem is, its own interface that everyday users can access is pretty primitive, it is a command line interface.

That means one needs to know how to invoke the command line interface of your operating system, and then enter a command similar to this one:

exiftool -artist=”Glen Barrington” StAugustine001.jpg StAugustine002.jpg StAugustine003.jpg
The line above inserts the name "Glen Barrington" into the metadata field callled "artist" in the three jpg photos called StAugustine001, StAugustine002, and StAugustine003.

To me, the command line is only a viable solution if I have a batch of photos to alter.  I want an easier, quicker way to modify the metadata, especially if it is only one photo at a time.  It is very powerful in that a command line interface allows for many subtle changes on a batch of photos.  BUT, that can be a lot of typing!

I personally found it to be a pain in the neck for one photo at a time.  I wanted a point and click type of user interface.

That's when I discovered ExifToolGUI written by Bogdan Hrastnik.  You can read about it here: http://u88.n24.queensu.ca/~bogdan/

It was great! It allowed for that point and click user interface and even allowed one to access the command line interface of ExifTool directly from within ExifToolGUI itself!

Exif Tool works with Win 10, but ExifToolGui does not, though some claim to have gotten it to work.  At least I haven't been able to get it to work in spite of following the directions of people who have gotten it working.

I'm not entirely certain if it is an ExifToolGui issue or a Windows 10 issue. I've seen odd issues with Win10 and other software that make no sense to me.  At any rate, I've given up on ever getting it to work and set about finding something that DOES work for me.

I have found two products that work reasonably well for me on Win 10.  They are ExifPilot and PhotoMe.  I will discuss them in sequence.

ExifPilot


ExifPilot is a free, but commercial, product published by TwoPilots Software. You can find it here: http://www.colorpilot.com/exif.html

I like this product very much.

To see a larger image, click on the photo.
For free, it will edit metadata on a single photo.  If you want to add batch processing, they charge $79.95 USD.  To me, that seems kind of pricy.  I might consider a $25 price to upgrade but not at $80.  I can't help but wonder if they would make more money on this product with a lower upgrade price, but I'm sure they have had someone run the numbers for them for optimal pricing.

While batch metadata processing is a great convenience, I only need batch processing outside of what ACDSee provides, maybe 2 or 3 times a year.  For that sort of money I will use the command line interface of ExifTool.  But ultimately, that is a decision only you can make for yourself.

It's a pretty straightforward user interface consisting of 3 columns with your folder hierarchy on the left, the file selection column in the middle and the column on the right, stacks the thumbnail image above the metadata display column.

Usage is pretty intuitive. You launch the program, and the last folder you were in is the default, and if you want another folder, you have to wait until that folder is fully displayed before you can switch.

After that, the operation of the program is straightforward.  The only surprise, which made sense after thought about it, was that one can't click on the field in the right hand column to change the field being displayed.  

Instead, the user has to click a button at the bottom of the column to bring up a change window.  (see screen print with superimposed arrow)  This is a good thing in that the user can't accidentally click on a field and change a field without meaning to.  The user has to make a conscious decision to change a field.

I tried to set it up as an external editor from within ACDSee Ultimate 10, that didn't work so well.  While I could select a photo from within ACDSee, and right click on it, Exif Pilot would launch, but it did not take the photo.  Instead, it opened the last folder used the previous time you used it.

Things I wish Exif Pilot would Fix/Change

  • Allow ExifPilot to function as an external editor for photo managers
  • Allow the user to control what default photo folder to open the program in.
  • Change presets would be great, one could create a preset and apply it to as many photos as we want.
  • As I said earlier, I like this software very much, but the $79.95 upgrade price for batch processing is simply too high for me to pay. (It costs more than ACDSee 20 which will do batch metadata editing on SOME metadata, but not all) 
But if you are content with single photo metadata editing with a standalone editor, it is an excellent product.

PhotoME


I found this to be an odd and interesting application.  https://www.photome.de/

It is a free program, the web page doesn't say anywhere that I could find that it is open source, just that it is freeware.

It has some great ideas that I wish were incorporated into other exif editors.  However it has serious flaws that make it unacceptable for any but the most primitive metadata editing.

Click on the image to see a larger version
PhotoMe will display a miniature icon in the upper right hand corner of the window, of any OTHER applications that are identified as the default program for that file type.

It does not do batch editing, however it can be set up as an external editor from within ACDSee (and I assume other file managers) so incorporating it into my workflow is very easy.  If I can't make a particular metadata change from within ACDSee itself, I can just right click a photo and send it to PhotoMe directly.  Unfortunately, it still only works on one photo at a time, and if you try to send more than one photo to PhotoMe, it won't load ANY photos.  However for one photo at a time editing, it is convenient to launch as an external editor from within ACDSee. 

It seems to display all the Exif tags and fields even the ones that it can't edit.  The great thing is, it identifies the official tag ids, which can be useful at times since not all applications that display metadata use the official names that the tag id represents.  To learn more about EXIF tags, go here: http://www.exiv2.org/tags.html

It also groups the Exif data by its function, and has navigation tabs to facilitate the user editing the exact data that he or she wants to edit.  I think this makes great sense, when we think of a photo's exposure information, we don't think about it's tag ID or its storage location in the metadata portion of the file format, we think about "exposure info" and we are going to want to make sure that all the exposure info is correct.  PhotoME's method makes the sort of data you are looking at very clear and obvious.

The fields that it can change are highlighted in blue, one just clicks on the content column where the content is blue.  If the field is blank, you won't know if the field is editable until you click on it.  if it is editable, an edit window will appear, if it isn't, nothing happens.  I think the field name, the Tag ID should also be highlighted as well as the content field for easy identification.

PhotoMe doesn't support IPTC data, but I don't personally use that info very much, and I can change most of that from within ACDSee anyway (and in batch mode)

PhotoMe's support for raw is in need of an update.  To edit a raw image, you open the standard Windows 10 "Open File" window and select an image.  

However, while open file dialog window will display ORF files from my E500 and my E30 cameras, it will not display ORF files from my newer E-M10 (which is about 3 years old).  However, once either set of raw files are opened, both display for editing.  I have current Windows codecs installed, so it isn't a codec issue.  If I use ACDSee as a front end for PhotoME, this won't be a big issue since I can use ACDSee to view and select files for editing in PhotoME.

I have found it impossible to Export metadata from a photo to an intermediate file for import into another photo.  Right now it's pretty useless.  I can't export or import ANY info from a raw file, and while I can export from jpg or tif files, I can't import the exported files.  This is VERY problematic for me.

This is completely unacceptable in my eyes.  The ability to edit ONLY the data that PhotoME finds in a given photo makes the application completely unusable to repair metadata issues where that data has been stripped from an image.

The things I wish PhotoMe would fix/change.
  • Finish the metadata import/export functionality
  • The raw files discrepancy.
  • Add support for IPTC and XML data
  • Add batch capability.
  • Add the capability to accept multiple instances of selected photos from ACDSee or other photo managers, and either go into batch mode, or even just open multiple instances of PhotoME.
  • Change presets would be great. one could create a preset and apply it to as many photos as we want.

My Conclusions


ExifPilot seems more complete and less . . . tenuous.  While PhotoME offers the PROMISE of integrating into my ACDSee based workflow better, it simply is not in a tested ready state I expect.

With an ACDSee/PhotoMe combination, I could do much of my batch EXIF/IPTC editing needs from within ACDSee itself.  Then for photos that require editing ACDSee can't do, select photos for a round trip to PhotoME for individual attention.

But at the current state of affairs, PhotoME is all promise and no delivery.  I will likely use ExifPilot.  

I would have no problem paying $25 - $30 USD for the perfect Exif editor.  But so far, the perfect Exif editor doesn't exist.  At least not for Windows 10.


Thursday, September 15, 2016

ACDSee Ultimate 10

 A Quick Review from an Experienced User

As I write this, ACDSee Systems has released, just today, ACDSee Ultimate 10, ACDSee Pro 10, and ACDSee 20.  (Click HERE for a brief explanation of the 3 different products, and a quick review of ACDSee Ultimate 9)


Please note that this is a review of ACDSee Ultimate 10, I have not had time to examine Pro 10 or ACDSee 20.  While I am reasonably confident that shared features between the 3 products will be roughly similar, if not identical, I can not guarantee that will always be the case.  If one of the other two products interest you, please download the trial version for that product and verify it meets your needs before purchasing.  It's the smart thing to do!


 I like this version, and I believe that someone who is looking for a tool to manage raw development, and bit mapped editing will find this a worthy new purchase or upgrade.  However, for existing ACDSee users, who are primarily interested in the rich media management environment that ACDSee already offers, the need to upgrade is less immediate. V9 was already a very good media  manager, and V10 is pretty much the same media manager.

I think the addition of the ACDSee Dashboard and the Smart Brush technology, strongly indicates that the level of aggressive creativity that ACDSee Systems has demonstrated over the last 3 or 4 years, has not diminished.

I also think that the addition of enhanced noise control via the new Preserve Detail sliders also illustrates ACDSee's commitment to making solid enhancements to the existing infrastructure.

The noteworthy changes in my mind are as follows:
  • In the Selections menu there is now a "Delete Selected Pixels" item. This will set selected pixels transparent if the currently selected image is a layer image, or set mask pixels black if a mask is currently selected. A convenient feature, in my mind.
  • The blend modes now work with actions. I haven't tested this as yet, frankly, I don't use actions much; but this should enhance the ability to more completely automate the editing process.
  • Enhanced Noise Control with the addition of the Preserve Detail sliders. This is a much needed enhancement, and it increases the quality of native Noise control in ACDSee.
  • Smart Brush technology shows up in both the Develop tab and in the Edit tab. It seems to show up in the masking tools and in the selection tools. I found this technology to show great promise in improving the speed and convenience of selective editing in ACDSee Ultimate 10.
  • The ACDSee Dashboard - There is a lot of useful information stored within your ACDSee database that you can use to help you make decisions in your photographic practice. This is designed to help you more easily access this information.
I will discuss the last three points in some detail below:

Enhanced Noise Control

ACDSee has never been famous for its noise control. It isn't BAD noise control, but up til now, it has been pretty basic, not really capable of any subtlety in its noise control efforts.

The net result is that long time users might be willing to use ACDSee for the really EASY noise control but then would use a third party noise control tool like Topaz Denoise for the more challenging stuff.

However the addition of the Preserve Detail slider and the Preserve Detail Threshold slider allows one to fine tune the noise control efforts a bit.

This addition does NOT make ACDSee as good as Topaz Denoise, but it does change the point a bit where where one would feel the need to use a third party tool. 

I can only applaud this effort and want it to continue.

Smart Brush Technology

I LIKE the tools that use this technology!  This might be the single most important addition to ACDSee series 10 versions.  The smart brush is added to the Develop Brush Drop Down Panel and in the Brush selection tool for the Edit tab.

My comments below, specifically address the implementation found in the Development (i.e Raw development) tab.

Smart Brush Panel in action.
Click on this photo to make it larger.


There are 4 smart brush algorithms that you can choose from.

1. None - essentially the "off" mode.
2. Color - Appears to lay down the mask according to color differences.
3. Brightness - Appears to lay down the mask according to brightness level differences.
4. Magic - Appears to be some sort of proprietary selection algorithm.

There is also a "Tolerance" Slider that can vary from 1 to 100. I suspect in time we will learn to value this slider very much. It seems to be the secret to successfully using this new selective edit tool. What I THINK is occurring (based on my observed behavior of the tool, no special information on my part. So I could be wrong!) is that a value level is determined by the initial Nib width size of the brush. And this value is the comparison value of the smart brush technology.

A slider value of '1' means there is very little tolerance for differences. 

What appears to be happening is, that when the brush lands on a new area of the photo, it compares the value of the new area to the original comparison value. Essentially, with a slider value of '1' there can be no differences in the comparison values for the mask to be applied to the photo at that location.

A slider value of '100' seems to mean that the comparison differences to have the mask applied to the new area of the photo is VERY broad. In effect, it practically turns the Smart brushing off and allows almost everything to be applied to the Develop brush.

The user can adjust the brush size at any point.

So far, My testing of this tool is VERY preliminary. These are my initial notes on this tool.
  • Set your Develop Brush size before entering Smart Brush mode
  • Only then, move then move the Smart brush algorithm from 'None' to one of the other 3 algorithms. If you are in doubt as to which to use, start with 'Magic' it works pretty well as a general purpose selection tool, I think.
  • Set your tolerance (I suggest starting at about 20). You can change the tolerance in the middle of mask selection, but it won't reconfigure those parts of the selection mask already applied, only the future selections. I suggest if you think your tolerances are too high or too low, that you back out, and start over.
The Edit Tab's Brush Selection Tool
Click on this photo to make it larger.

ACDSee Dashboard

Essentially this is a database statistics tool It provides information both statistically and graphically. There are 4 sub-tabs within dashboard.

Overview - This gives you a summary of the information found in the other 3 sub-tabs.
Database - This gives you information like Database size, Last backup, File information, Folder Info, Number of orphaned files, and thumbnail information.
Cameras - Information on the cameras you use, graphics and and statistics on ISO photos are shot with.
Files - Statistics and graphics on number of images and videos, the file formats and the image resolution.

Dashboard's Camera Summary
Click on photo to make it larger.


This is a VERY important new tool, I think. However there is plenty of room for improvement. For instance, I'd like to see information on the focal lengths used. And maybe in a future version there could be a way to add a limited number of user defined statistics.

But overall, this is a really useful new feature in my mind.

Tuesday, September 6, 2016

Big Shots

I was visiting Lincoln Memorial Gardens just outside of Springfield, Illinois this morning. It is the place I go to whenever suburban life and the smell of mown grass and heavy automobile traffic becomes too much for me to bear. Its efforts to recreate the woods and grass prairies of Illinois offers a wonderful renewal of the soul.

It is, of course, a great place to take a camera. I came across a man who must have been lugging what had to have been 30 pounds of weight in the form two cameras, big white lenses, tripods a couple of camera bags and what looked like an ammo belt peppered with what looked like lens pouches around his waist. His wife was struggling to carry a suitcase sized and shaped aluminum camera case. (I assume it was his wife, she had that bored, resigned look mixed with repressed anger on her face that I associate with women married to photographers).

I was equipped with what I consider my 'heavy' gear. My OMD E-M10 with my old Olympus 14-54 mm zoom lens with adapter.

We nodded as we passed, I got the impression that he was wondering HOW I could take pictures with that gear. I know I was wondering that about him!

Friday, August 26, 2016

NIK and Topaz Tools Strange Color Shift!

I've discovered an anomaly when using NIK Color Efex Pro 4 quite by accident. It's not restricted to just NIK tools, as I've also seen it In Topaz Detail 3 and Topaz Adjust 5. I have NOT seen it in Topaz Denoise 6, But to be fair, Denoise underwent a major rewrite lately and I wonder if that is why it doesn't exhibit this flaw.

Let me give you some history.

When I installed the NIK tools in ACDSee Ultimate 9, I noticed that color and tonality from within NIK Color Efex was different from the color and tonality of the photo I sent to NIK Color Efex from ACDSee Ultimate 9.  It was driving me crazy!

Note the Sample Image Below:

The comparison between ACDSee Ultimate 9 and NIK Color Efex.  The difference is quite noticable.  Click on any photo to see it larger.


I discovered that if the photo's color profile was set to Pro Photo RGB then the color difference between the version displayed in ACDSee and the version displayed in NIK Color Efex was quite pronounced.

So I tried to invoke Color Efex from Corel PSP X8, and the colors were the same! At first, I was calling ACDSee all sorts of names, but then I noticed that PSP was ALWAYS converting the ProPhoto version to SRGB upon receiving the photo. (I checked and apparently PSP X8 doesn't support Pro Photo and defaults to SRGB!)

So I converted the Pro Photo color profile for my test photo to ARGB and to SRGB, and then invoked NIK Color EFEX 4 from ACDSee Ultimate 9 as a plugin.
All three color profiles look roughly the same When displayed in ACDSee Ultimate 9.  Click on any photo to see it larger


ARGB in NIK was very close but not identical to the sent ARGB version. 

I don't know if this screen print shows this, but there is a slightly extra amount of yellow in the NIK version, though I doubt the color shift is enough to make the NIK version unreliable, or even noticeable in most cases.  Click on any photo to see it larger.

The SRGB in NIK was virtually identical. 

Click on any photo to see it larger.

I brought this up on a popular photo forum, and another user reported the same behavior on Affinity Photo.  So, apparently this goes beyond ACDSee and Windows.

I'm not sure what the right thing would be for ACDSee to do in this case (if ANYTHING, is this really their problem?)   But if you are experiencing this odd color shift with NIK or other plugins, you might want to look into this possible cause!

Friday, June 24, 2016

More on the importance of the Hasselblad X1D . . .

Will ALL current cameras become museum pieces?
I've owned and operated many Medium Format cameras over the years.  I've owned Bronicas, Mamiyas, and I still have a much loved Yashica Mat 124G.  What can I say about that last one?  Some cameras just speak to you, regardless of comparative quality. 
The dialog around the X1D is starting to separate out into two camps.  Those who see the X1D as an expensive, and conspicuous show of wealth, with no real impact on photography, and those who see the X1D as something that is inherently a game changer and a threat to the FF DSLR.  I am in the second camp.
Modern photography is now very much a part of the consumer economy.  The X1D isn't important because it is a good camera, indeed, it may or may not be a successful new camera introduction, the results are not in on that.   There are many reasons why a given camera may succeed or fail.
The X1D is important because of what it means for the future of photography.   What we are seeing is that sensor/film size no longer has as direct a correspondence to camera size and usability that it used to have.
The X1D is only a tiny bit larger and a tiny bit heavier than the Sony A7RII.  And as much as I love my m43s E-M10, the X1D isn't THAT much bigger and heavier than the larger m43s camera bodies.  The gap between 'big' and 'small' is narrowing.
It may be too early to tell until we get the camera into hands of the early adopters, but It seems that it is not just 'reasonably hand-holdable', it is VERY hand-holdable!  We've all seen MF SLRs, they are NOT ideal hand held devices.  People use them for the image quality, and NOT for how convenient they are.  Hasselblad seems to be trying to develop a convenient MF camera.
Is the X1D a threat to the current crop of FF DSLRs?  Probably not, at least at list prices.  But I remind you it uses a SONY sensor.  What if Sony decides there is a market for a lower priced MF mirrorless camera similar to the X1D? It would seem a 'doable' project for Sony if the design and build costs work out.
What if Olympus decides the "M" in m43s should actually stand for "Medium"?  
I think the need to differentiate the quality found in dedicated cameras from the cameras found in smartphones may force manufacturers to seriously consider upsizing their sensors, and when/if that occurs, the mirrorbox will be discovered to add a lot of size, weight, and mirror flop tortion for no good reason.
What we are seeing is a result of the success of the smartphone as a "go everywhere" camera.  The recent smartphone offerings are getting pretty good, and no one thinks the image quality of the smart phone cameras will stop getting better.  
Hasselblad has given us a possible way to keep the stand alone dedicated camera a viable photographic tool.  I think the other manufacturers would be foolish to ignore it.

Thursday, June 23, 2016

Does the Hasselblad X1D Change Things?

Do you remember in the absolute very first Star Wars movie, when Han, Luke, and Leia are in the garbage pit of the Battle Star, and the walls start closing in?  I imagine that must be how Canon and Nikon feel.
Is how we will come to think about the DSLR?

My very first reaction when I saw pictures of the camera, was a yawn.  So it was a big version of what I already had with my Olympus E-M10!  Big deal! Yeah it was a much bigger sensor, but it WAS essentially a 4:3 sensor, and I DID have a better selection of lenses.  And the price, while something of a bargain, considering the format and manufacturer, is so far out of my financial capabilities that I saw the thing as irrelevant to my life and my photography.

However, once I started thinking about what the X1D actually meant to photography and photographers, in general, I realized that this just might actually BE the game changer, we all like to  talk about but never really see!

Click to go to Hasselblad Web site.

A medium format mirrorless camera that weighs only a small bit more than the Sony A7RII is a very remarkable thing.  And while the price is high, it is priced low enough that it will undoubtedly draw some sales away from many FF DSLR cameras particularly those higher cost, and presumably higher margin camera bodies. Particularly so for those who are interested in studio work, or possibly, landscape photography.

I think Nikon and Canon have to start thinking about what this means for the DSLR camera format.  Is it SO absurd to think that DXO/Mamiya, Pentax, Sony, or even possibly Olympus could produce a similar camera at a lower price?  A price that skirts dangerously close to the upper end DSLRs?

Canon and Nikon MUST see that the walls are starting to move.  The area in which they are free to operate just got smaller, and once some manufacturer recognizes that there is a market for a less costly camera, their ability to move freely will be even further restricted.

I would remind you that our Star Wars heros, ultimately got out of their shrinking prison, but they found it a rather unpleasant escape.  Will Canon and Nikon escape their newly encountered situation?

I don't know, but I do believe this is one more nail in the coffin of the DSLR.  the DSLR isn't going away for a while yet, but I believe the handwriting is on the wall.  And that wall is moving towards Canon and Nikon, it is their actions that will determine how well they survive.

Saturday, June 18, 2016

Psychological and Attitudinal Implications of Photographic Gear Choice

During a conversation I had with a new adopter to m43s from a FF system, he mentioned that he felt that his photos were different from the photos he had been taking, and when he made a conscious decision to shoot his "old style", he felt the composition and overall quality of the photos were not as good as they had been.  Overall, he felt a bit dissatisfied with his change to the new m43s system.

I wasn't sure how to respond to his complaint immediately, so I let the comment slide past me.  However, it kept nagging at me, and this post, however inadequate, is an attempt to respond to his complaints.

In looking back at my photos taken over the years with other cameras and other formats, I see a significant difference in the type of photos I take with 4/3s and m43s cameras than I did with 35 mm cameras and other cameras with other aspect ratios.

The photos taken with 4/3s and m43s cameras all seem to be more, "intimate" in nature than do the photos taken with other cameras.  Those photos, the ones not taken with 4/3s of some sort, all tend to be more 'sweeping' in nature.  I acknowledge that the terms "intimate" and "sweeping" are rather indistinct and not defined by me, but those are the feelings the various photos evoke in me.

However, I first adopted 4/3s roughly at a time when I was

  1. Acknowledging that I was not, and never would be, the next Ansel Adams.  
  2. Concerned that maybe I was using photography to separate myself from my life.  That maybe that viewfinder was a convenient tool to prevent me from experiencing my life, so I could just watch it like a CinemaScope movie.
With the 4/3s formats, I tend to create a lot of square format photos and do a lot of close ups, both of which, in my mind at least, are features of a photographer trying to connect with his subject.  And my landscape photos seem to be less sweeping and more focused on the details of the natural world.  Even my 'sweeping' landscapes tend to have little details in them than really only get noticed on close examination, and they are frequently stitched panoramas since I don't associate 4/3s with 'big sky'. 

In Memoriam


I think I have grown as a photographer since I switched to the 4/3s formats. I can't say, if that growth would have occurred anyway, or if my adoption of 4/3s accelerated that growth, but I do know they are connected in time. 

My point is, I think I unconsciously selected 4/3s because I associated it with the qualities I wanted to develop as a photographer.  Whether 4/3s actually has those qualities or not is almost irrelevant.  In my mind they did, and still do have those qualities.  M43s helps me SEE the photos I want, and it helps me create the photos I want.

I think our choice in hardware is far more complex than we want to acknowledge. And I bet that photographer I mentioned in the first paragraph isn't having problems with the format, as such, so much as he is in reconciling his attitudes about the gear and what he expects from himself.

Thursday, June 16, 2016

The Inevitability of Change

On a forum I frequently visit, I asked a question about wireless charging of our cameras.  I like the idea of wireless charging.  I have it on my smartphone and on my smart watch, and it is VERY convenient.  
The way I use my camera, is that there are weeks of idleness, that are punctuated by a few days of frenzied photographic activity.  Then more idleness as I sit down and try to figure out what I want to DO with the photos I have taken.
The problem I face is that the batteries in my idle Olympus cameras gradually fade until they are empty.  And I run the risk, at some point, where my custom settings cease to be.  When the capacitor that holds a small charge to keep the camera functional when the batteries are removed, also fades away.
A wireless charging system would keep the batteries topped off and eliminate the need for me changing the idle battery  for a fresh battery once a week or so.  This isn't a major problem for me, but it WOULD be a minor convenience that I would like to have.
Naturally, in that forum, I got all sorts of detailed explanations of why such a thing would never come to pass, why it was impractical, that the the technological differences between cameras and smartphones are too great, and why the manufacturers would never be so stupid as to even try such a thing.  I also got a lot of suggestions that I should just shut up and continue to rotate batteries the way God intended.
It is my belief that anything that sells cameras is good for digital photography in general.   We no longer have consumables that can drive the ongoing profitability of companies involved with photography.  We don't have film, or developing chemicals, for example.  We do have printer ink and printing paper, but in this online age of photo sharing, their value is greatly diminished.
All the photo industry has for ongoing profitability is new technology and gear churn, and that is why we see annual model changes in camera model lines.  This isn't greed or venality on the part of the photo industry, it is basic survival.
As a result, I think wireless charging is an inevitable feature in the quality cameras aimed at the consumer and professional users in spite of all the very valid and technological reasons as to why (some people think) it will never happen.
Perceived convenience on the part of the consumer is really all the justification that is needed for offering this feature and making an investment in the R&D.   I suspect that the minute it becomes do-able, or even kinda/sorta do-able, it's going to happen. 
The early models will no doubt be of marginal value, and all the nay-sayers will say, "See! I told you so!" But if there's any merit to the idea, and in this case, merit, means an affirmative answer to the question, "Will it SELL more gear if we make a few tweaks?", then the second and third generation devices will be produced and improved.
This is the same path that smart watches have taken. And is the path that Smartphones took from the original Palm Pilot, to the Apple Newton, to the Treo, to the iPhone, to the Samsung G7 which DOES have wireless charging, btw.  Please forgive the missing steps in smartphone development, but you get the idea, I hope!
It is also the path that Auto exposure, Auto focus, and image stabilization took within the camera industry.  I was there, back in the days of the dinosaurs.  There were people back then who also gave detailed and very well reasoned explanations as to why those things would never work either!
I believe that ultimately, the need to sell me, and you, new gear will overpower any technological reasons of why "it can't be done."  As a result, we will not only have wireless charging in the near future, but several new convenience features we haven't even thought of.
I don't care all that much what sort of engineering and technical design issues the Camera manufacturers face, so long as they give me the convenience I seek.   We are long past having to worry about basic image quality in cameras,  even the cameras with one inch sensors produce pretty good images, and the 4/3s and APS cameras produce downright outstanding images.
The future for photographers is going to be great and more convenient, I think!

Wednesday, June 1, 2016

The Best Explanation of Pixel Targeting I've seen, so far!

The tutorial I link to is so good, I wish I had produced it!  Several people have tried to explain ACDSee's Pixel Targeting tool, and have not done so well.  I did one early on when PT first was released, but It wasn't very good and I removed it from this blog because I was ashamed of it!

I won't call this the best Pixel Targeting tutorial ever, because who knows, a better one might come out tomorrow!  But it is the best so far!

LINK BELOW:

The Best Pixel Targeting Tutorial so far!

Friday, May 27, 2016

How to Get KILLER B&W Conversions with ACDSee


One of the great mysteries of digital photography, to me, at least, is the popularity of special Black and White conversion software.  On the surface, it would seem to be one of the least needed categories of software, yet its popularity as a category is perennial, and many people have clear favorites and argue endlessly on various forum sites as to which particular B&W conversion software is better.

B&W conversion software is expensive for what it does, and what inexpensive conversion software that is out there frequently limits the user to a selection of filters that force the user to compromise their vision of what their B&W conversion should look like, in favor of quick and easy canned conversions.  And that software which DOES offer a high degree of customization is usually as expensive as the user's other editing software and does no more than what that other software already does anyway.

Regardless of the software used, really GOOD B&W conversions can be done with just about ANY Editing tool, Workflow tool, or DAM tool on the market.  All it really takes is about 5 minutes for an internet search on B&W conversions for your software, and reading 2 or 3 tutorials on the subject.  Of course you will need to practice, but with any competent specialty tool, you'll still need to practice anyway, unless you are content to mindlessly accept whatever a filter throws at you.

As a rule, blind acceptance of other people's judgement requires a LOT less work than thinking for yourself. If you are ready to think for yourself, you REALLY don't need B&W conversion software.  Chances are, you've already got all the tools you need, and the level of effort will be NO GREATER than using Special B&W conversion software.

This article is about doing B&W conversions with ACDSee Pro, and ACDSee Ultimate from within the Develop Tab. (i.e., Non destructive development.)  As opposed to the Destructive method found in the ACDSee Edit tab and in most editors like Photoshop, and Paintshop Pro.

I will not cover destructive B&W conversions in this article, mainly because I prefer non destructive methods, and it is what I use on a daily basis.

What Makes a Good candidate for a B&W Conversion?

Clearly, the first task in a good Black and White conversion is selecting a photo to convert!  In my experience, the best candidates for B&W conversion have the following characteristics:

  • The photos place an emphasis on lines, shapes and shadows.  I'm not talking about JUST actual lines and shapes, but lines of sight from subjects to something else, leading lines, etc.  The thing is, if you feel that the color inherent in the photo weakens or diminishes the lines, shapes, and shadows, it is a candidate for B&W conversion.
  • The photos already have a sense of 'texture' about them.  I don't want to leave the impression that this is just about feathers, or the bristles of a hair brush, But it could also be a sense of . . . 'granularity' between living subjects or living subjects and inanimate objects.  This granularity can be emotional or physical distance, but in all cases the photographer feels the sense of distance is weakened by the inclusion of color.  We could also be talking about repetitive patterns here.
  • Photos that take on an entirely different meaning or 'feel' when converted.  
That last point is a lot harder to explain than the first two.  Such a photo might not have either of the first two points, but you, as the photographer, suspect that there are hidden layers of  meaning and emotion buried in the image, and that a good B&W conversion might expose them.  I think the demonstration photo I've used for this tutorial is a good example of this.  In its color format, it is an interesting experiment in color and shapes.  But In black and white, I think it transforms into an illustration of hard work and sweat, with just a hint of mud.  A lot of that context is lost when you have the color competing for your attention.  It's not as pretty as a black and white photo when compared to color, but I think it is a bit more powerful as an image.

The Conversion Process

Consider this photo displayed, to the right (click on any photo to see a bigger version):

I have selected a 'done' tif file for my B&W conversion even though I intend to use the Development tab, which is normally viewed as 'The Raw Development Tab'.  Which it is.

But, the Development tab can be used on any non layered photo, not just raw.  It will perform bit mapped like edits on bit mapped files like tif and jpg photos.  The only difference is, instead of actually editing the photo itself, it saves the changes to the "sidecar" file and applies those changes to the photo whenever that 'developed' image is displayed in ACDSee.

This is a good thing for me, and I think, for you, in that experimental and extra editing like B&W conversions can frequently be completed without using any sort of destructive editing.  This is an additional reason to use ACDSee Pro or Ultimate rather than a B&W conversion utility, since I have never seen one that claims to be anything but a destructive editing process.

The Conversion Steps

This is how the image looks when I bring it into the ACDSee Develop Tab:


The first thing I do, is click on the Black & White Treatment tab in the General Control set.  All this does is desaturate the image color, nothing more.  Don't worry about losing your saturation information if you change your mind, being a non destructive editing process, your saturation information is saved and you can go back to the EXACT same level of color saturation as before.

But it does one extra thing, it changes the Color EQ control to the Advanced Black and White control.  Even though they look very similar, their purpose is very different.  I will explain the Advanced Black and White Control in just a bit.

But let's go back to the desaturated image.  Note that it is a pretty bland conversion.  Straight desaturation doesn't take the tonality into consideration at all.  If a blue object and a red object reflect the same amount of light, they have roughly the same tone in a desaturated image.  Note that how the red frame of the wheelbarrow, and the blue box of the wheelbarrow seem very similar in tone even though the color version of the photo displays them very differently.

Clearly, we need to do something more to this photo for it to achieve what I think it is capable of.

There are three things I don't like about this photo. First, as stated before, the red and blue colors are displayed as almost identical shades of gray, turning the wheelbarrow into a very boring object.  Secondly, the image is too flat overall. And thirdly, the wheelbarrow simply doesn't stand out from the background to the point that it is the subject of the photo.

The Remaining Steps


Set the black and white point via Tone Curves.

Many people find this intimidating, but all this step does is define the point that says, "Beyond this point on the grayscale, everything should be pure black", or "pure white".

To be honest, there is no great secret in doing this.  It is entirely a guessing game on your part based on your tastes, judgement, and experience.  There is no rule of thumb and it will vary from photo to photo.

See the tone curve control.  Note that what I did was slide the black point a bit to the right, and the white point a bit to the left of the screen.  Just a bit,  What that did was actually narrow the distance from the blackest black to the whitest white.  The white line represents the black and white points

In other words, what I did was increase contrast a bit.  Could I have adjusted the contrast control instead?  Yes, but by being able to set the black point and white point separately, I was able to control the contrast to a much greater degree than I could with the contrast control which uses a predetermined algorithm to set the black and white points. 


I rather like how this increases the separation of the wheel barrow from the background. 
Remember, you can click on any photo to see it full sized.
In this case, I ignored the Midtone point, but I could have adjusted it as well.  Mid tones are represented by the yellow line.  If you change the mid tone, say to the left,  what occurs is that the distance from the mid point to the black point is shortened and the distance from the mid point to the white point is lengthened.  And where the yellow line intersects with the White line moves UP, forcing the lighter tones to brighten even more,  In this case, I think it flattens the image rather than forcing the wheel barrow to be the dominant object.  However I can see that maybe the dark tones could be moderated a bit.

The image is even flatter, and the brightness makes the scene a bit too 'happy' for my tastes.

Use Light EQ to Adjust Lighting Bands.

I won't go into great detail on this step since I have written an in depth article on Light EQ, HERE.  It is, without a doubt, one of the single most important tools found in ACDSee Pro or ACDSee Ultimate.

The Light EQ control divides the photo up into between 2 to 9 separate lighting bands with separate light and dark controls for each band.  I normally leave it set to 9 bands unless I have a strong reason to use less.


Now THIS image moderates the Too Somber tone with the Too Happy tone, and finds a good median I think. Note that if you look at the sliders, only the darkest areas are moderated.  However we still have no tonal separation between the red and blue sections of the photo.

Advanced Black and White Control

What the Advanced Black and White control does is allow you to adjust the tones in a photo based not on their relative brightness or on their black and white control points, but on the colors found in the photo.

When you slide a color control to the left of the screen, any object that contains that color gets darker, and when you slide that color control to the right of the screen, that color gets lighter.  Look at the wheelbarrow in the Pre color adjusted image and compare it to the completed photo below.  Then look at the position of the sliders on the screen print of the control on the right.

You will notice that by moving the Red slider to the right, I lightened the red in the photo considerably.  And by moving the Blue slider considerably to the left, I darkened the blue considerably.  

I could have done just that and met the goals I had for the photo.  But I don't think it would have been "Done" by any stretch of the imagination.

No object is ever just one color.  Most things are a mix of several colors, either from impurities in the color of the paint or dye, or from reflections from objects that are physically close to the object whose tonality you are trying to control.  By working through the other colors.and adjusting their sliders experimentally, you will learn exactly how the colors interact with each other.  And I recommend that you do this for many years until you are a grizzled B&W professional who simply can't learn anything else about this subject, or until you die, whichever comes first.

For this photo I found that adjusting the colors that were close to red and blue seemed to affect the photo's tonality for the better.  I particularly found that darkening Cyan added an extra bit of 'grittiness', from stains and water marks, that kept the blue from being perceived as some sort of 'circus color'.

That's pretty much it. Unfortunately, describing the process takes far longer than actually doing it.  As a result, I fear this article makes B&W conversion seem too difficult to do quickly and easily.  But in truth, I had produced this image in about 1.5 to 2 minutes.  Finding the perfect image to use as an example took FAR longer!

However, I DO think I've made my point that you don't need to buy expensive add-on tools to get good Black and White conversions.  In fact, I don't think any of the add-on tools could have done as well.  They might have come close, but they would have needed further tweaking, whereas using your native toolset allows you to get exactly what you want with usually less work and certainly taking no more time than when using an external tool.

Have fun!


Sunday, May 22, 2016

My Noise Control Workflow

As an m43s shooter, noise is something I'm aware of.  As a rule though, I'm not a 'noise nazi',  I'm comfortable with a little bit of noise so long as it isn't distracting.  And frankly, there are times when a little noise can add a bit of texture especially to large patches of a single color.  
I tend to use the built in ACDSee noise control tool for photos with no significant noise/non problem photos. Say, photos shot at ISO 1000 and below and in 'reasonably' good light. And I tend to use Topaz Denoise 6 for photos with problematic noise (usually, stuff over ISO 1000). Though sometimes, the iso limit is higher or lower depending on the specific photo.
My Raw workflow concerning noise,
 is as follows:
  • Conventional raw development (exposure, contrast, Light EQ, cropping, etc)
  • ACDSee Noise Control
With Noise control, I first desaturate the image, and then address luminosity noise.  I've found that it is easier to identify L noise when I don't have to see it through any color noise.  Then I go back and resaturate the image, and address color noise.   At this point the only noise I should see is color noise and any L noise I CHOSE not to address.
This has really helped with noise control.  I don't get much in the way of color noise, as a rule, for 'conventional' photos, so for me, L noise is what I'm most aware of.
Once I'm done with the ACDSee Noise control, I examine the photo at 100% and determine if I'm happy with the results.  If not, I use Topaz Denoise 6.  I tend to use one the Topaz Light noise control presets as a start and then adjust the controls on the right of the screen.  I tend to pay close attention to the blue and red channel noise controls and the detail controls the most in Denoise.
  • ACDSee sharpening with a possible side trip to Topaz Detail 3.
In general, I haven't found that it makes a LOT of difference in the final product if I sharpen before or after noise control, and in the past, I did tend to sharpen before noise control.  But I'm finding that it makes more sense to do noise control first if you are willing to consider noise as a design element the way I sometimes do (see my noise as texture comment, above).
Overall, I'm pretty happy with my noise control efforts.

Friday, April 29, 2016

Photography Simply Doesn't Matter Any More

Convergence and Culture Shift


I guess at some point, we all have to come to terms with the idea that the very nature of photography is changing.  Never again will there be a small 'priesthood' of people who control access to photography because they are the ones willing to take the time to learn all the arcane stuff it takes to make great photos.


True, there is STILL  a lot of arcane stuff to learn about photography, and there are still people like us who take the time to learn it.  But the truth is, no one but us cares!

In the past, there were cameras and other infrastructure to bring 'photography to the masses', but even so, the premise was that the masses consisted of snapshooters, and the hard stuff had to be done by 'experts' who took the exposed film and turned that into photos.  The expert people were there at almost every step of the process, and it supported the, perhaps irrational, belief that photography mattered.

Now, the experts involved with the photographic infrastructure, the "priesthood", no longer stand between the user and their photos.  The Smartphone camera has changed all that.  And more importantly, it has changed how photography is viewed culturally.

We no longer even need to print the photos and use the postal services to send them to our loved ones, friends, and family.  We don't even need to attach the photos to an email anymore.  It used to be that photography was a sequentially shared experience.  The photographer got the photos back from the lab, and then sent the photos he or she was proud of to others for them to enjoy.  And those subsequent people enjoyed them on different days and at different times of day.  The enjoyment was a solitary experience, and then one sent the photo on to someone else, or kept them.  Either way, it was a conscious act on the part of the viewer.  

Now, we just let the camera automatically upload the photos to Google, or Apple, or Flickr and let the people use their phones to either view them directly from our online account, or download them to their phones so THEY can alter or repurpose them, or keep them unaltered, as a part of their personal collection of photographs.

But the enjoyment is no longer completely sequential. Instead, the illusion that we are all enjoying it together at the same time is created.  Through the use of comments and the  ubiquitous 'thumbs up'/'Thumbs down' votes we perceive that our photo viewing is now a shared experience.  Then too, we  no longer need to take active steps to send the photo to others.  We might post the photo on social media, but it too, is a shared experience with comments and the ability to vote on a photo's worth.

The photograph is out there, in the ether, waiting to be 'discovered' by other viewers.  Roughly 113 billion photos get 'published' on the internet each year.  I speculate, that only millions are ever actually seen. and of them, only a few hundred actually resonate enough with us to be remembered.  Even fewer are remembered well enough, by enough of us, to make that transition to some sort of cultural significance.

(citation here)  (2nd citation here) (3rd citation here)  Note: You'll have to do a little math to get the annual figures!

Is it any wonder then, that even established names in the camera manufacturing industry are struggling to sell enough cameras to survive?  Should we be surprised that no one wants to PAY for photographs that other people have taken?  When was the last time you saw one of those little wire display stands that held picture postcards of women on waterskis, or a picture of the local tourist trap on one side  and which said, "wish you were here!" on the other?"

There are no non photography oriented magazines that feature good photography any more, and few people actually clip photos from paper magazines because: 

  • There aren't that many magazines any more.
  • If they want to save a photo, people just go to the online article, and 'right' click the photo of their choice.
  • What's the point? When billions of photos get published each year, saving a photo that will only be considered inferior to some other photo that will get published tomorrow or next month seems meaningless, and it devalues what we are seeing even when we view the photo.

News organizations are firing staff photographers and are pulling photos off of Twitter for free, with which to illustrate their stories.  Apparently, it's cheaper to deal with the occasional minor lawsuit, than it is to pay for a staff photographer.

Then too, photo editing technology has helped weaken the economic value of photographs either for news, editorial, or legal applications.  The truth is, an expert retoucher can alter a photo in such a way that can fool another expert, or at least create reasonable doubt in that expert's mind.  This has served to  weaken a photograph's ability to function as a reliable witness.

I would estimate that not a week goes by that on some photography forum site, someone complains that their photos have been used without permission. Or that someone makes dark charges that some commercial entity is only out to grab photo rights from photographers.  And given the evidence, that is not an unreasonable assumption. 

But the point is, no one respects a photograph any more, or the work that can go into making a good one.  And as a result the concept of protecting intellectual property for any, other than giant corporations, is now becoming seen as anti-social.  If you doubt me, go to any social media site and make a complaint about stolen intellectual property.

I think the only conclusion we can draw from this is that photography is losing the cultural significance that it had acquired during the 20th century. Photography has been devalued culturally, and once that occurs, it loses its economic value, since culture and the economy are linked. 

The gains that the American "Photo Secessionist" movement of the early 20th century to get photography considered an art form, have been seriously eroded (not that I agree entirely with the photo secessionists,  that was a different time and place).  But I bet Steiglitz is spinning in his grave!

Anything that is as ubiquitous as photography now is, simply CAN'T be "Art".  Photography has been turned into that music which plays in the supermarket to get you to buy that extra can of spaghetti sauce.

Am i just an old curmudgeon wishing for the days of my youth?  I don't THINK so.  Certainly there are things I miss about the old days, but on the whole I think things have never been better for people driven to make photographs.  

Image quality has never been higher, the gear and the software has never been easier to use. I don't miss developer stains on my clothes or the foul odors of the darkroom.   And I sure don't miss the era when "Cut and Paste" meant literally one had to cut something out of paper and paste it to another piece of paper.

I'm fully aware there is something of a movement to embrace the old legacy photo technology.  I suspect it is minor, and will be short lived.  However, if it is a permanent thing, they will have to do without MY embrace!  I'm NOT going back!

As far as I'm concerned, bring on the new technology and the culture shift that comes with it! And bring it online FASTER!  At my age, I can see that mandatory check out time on the horizon, and I want to see and to do MORE before that event happens.  Just make sure I have a way to take the kind of pictures I want to take, and I'm good!