Mostly about photography. There will be an emphasis on editing photos; and to a lesser extent, Micro Four Thirds photography gear, and shooting techniques.
Showing posts with label ACDSee. Show all posts
Showing posts with label ACDSee. Show all posts
Friday, April 15, 2016
An HDR newbie's comparison of NIK HDR Efex and Photomatix Pro 5
Talk about bad timing! I bought Photomatix Pro 5 the day before I left for a 3 week visit to Texas. My intention was to go to Hamilton Pool, near Austin, and shoot some HDR sequences for a proper test of Photomatix Pro. During that 3 week stay, Google announced that they were releasing the NIK Tools 'out into the wild'.
In all honesty, if, when I decided I wanted to explore HDR, NIK HDR Efex had been available for free, I probably would not have purchased Photomatix. It is certainly an excellent tool with which to explore HDR photography. It's pretty good software, overall. Certainly its little quirks are quite forgivable considering it is now free.
That being said, after using it a bit, I think I would also have outgrown NIK HDR Efex eventually. I think Photomatix is simply easier to use, particularly if you are interested in the less tone mapped, more natural looking photos, as I am.
I don't think it is quite as easy to get natural results with NIK HDR Efex as it is with Photomatix. However, HDR Efex is probably the best FREE HDR software option out there right now (and I tried a LOT of them!), and you can get natural results with it, you just have to work a bit harder, I think.
See the two photos attached to this article. I used the same source photos shot at Hamilton Pool near Austin Texas, and tried to get them to look as much alike as possible. Please remember, I am not an HDR expert, and have minimal skills with either software package.
The source photos were taken with an Olympus E-M10 in HDR 5 photo burst mode using raw images. Click on the photos to make them appear larger and look their best.
This first HDR image, below, is from NIK HDR Efex. I like it well enough, but I see the sky and and the overhang of the dome starting to look a little too 'tone mapped' for my tastes. Also note the rock at the lower right, I've lost a LOT of detail there. And to make matters worse, NIK also stripped significant Exif data from the final photo image. This is one of my pet peeves, I hate, absolutely HATE losing the EXIF data when photos come back from a round trip to an external editor.
The second photo, below, is from Photomatix Pro 5.1.2. The sky and the dome look very close to how I remember it. The color of the water is purer, and the rock at the lower right, has quite a bit of detail. And of course, the Exif data from the primary photo was transferred to the end result. (Again click on either image to make it bigger so you can see it better)
I spent about the same amount of time on each composite photo. From my basic determination, I would say, that Photomatix is a bit easier to use, especially if one is looking for extremely natural looking photos. That being said, NIK made it very easy to get those super tone mapped, over the top photos many people like. Not surprisingly, Photomatix Pro 5 made me work a tiny bit harder (though not significantly so) to get strong dramatic tone-mapping.
I suspect this difference is a result of Google not actively developing HDR Efex for the last few years and thereby not keeping up with changing tastes in HDR, while Photomatix has done so with its products.
I was unable to get NIK to accept the raw image, the only way I could get it to work was to convert the raw to tiff files in ACDSee before sending them to HDR Efex. I could send the raw photos directly to PhotoMatix with ACDSee without converting them to Tiffs or jpgs. Both the HDR Efex and PhotoMatix software could function as external editors or as Photoshop plugins with ACDSee's bit mapped editor tab.
I'm sure some people will point out that I haven't practiced enough with NIK HDR Efex to make getting the more natural look in an HDR possible. And I am equally certain they are correct. However, I would still give a slight nod overall to Photomatix in terms of functionality and ease of use.
People who have bought Photomatix Pro 5, should not feel stupid for buying it. You still have the superior product, I think. However those people who want to explore HDR without spending money should seriously consider NIK HDR Efex. It is FAR superior to the other free options. You can always buy Photomatix later, once you are sure that you want to make HDR a part of your work.
Thursday, April 7, 2016
Using Smart Collections in ACDSee
Updated with new information on search criteria logic, on 4/19/2016
In photo management, we often times have to create regular collections of current photos for a variety of reasons. We might want to identify all the photos that have been taken by an E-M10 camera and cropped, for instance.
We could do this with a series of saved searches and this would work fine. However, if you have a large number of searches saved, it might be difficult to find the exact search you are looking for because all the saved search names sound alike, or because they are listed in alphabetical order and the first search you need to run, is separated by 50 other saved searches.
This is where ACDSee's Smart Collections come in handy. These are really nothing more than saved searches, but they have a hierarchical storage infrastructure associated with them. This allows the user to group the Smart Collections (i.e. the searches) in ways so that similar Smart Collections are easy to find and are physically close to each other because they are in the same category of smart collections. See the screen print below (note: click on any photo/screen print to make it bigger):
The results of a smart collection search can be selected and used in a variety of batch processes including placing them in a regular Collection (a collection without a saved search associated with it). So, with that capability, you could run a series of smart searches, and after each smart search is run, you could place the results into a regular collection, and thereby build up a larger collection of similar results built on that sequence of searches.
Unfortunately, none of the ACDSee software programs have the ability to run all the smart collections in the collection set and then treat them as if they were the results of a single search. So for now, we must manually run each search within a collection set and manually process the results.
HEY ACDSEE! That would be a good idea for some future update! It would ALSO be a good idea to allow ACDSee Action Scripts to be created for the manage tab as well as the edit tab. Think how cool it would be to be able to batch process the results of a search or a smart collection with an ACDSee Action script!
How to Create a Smart Collection
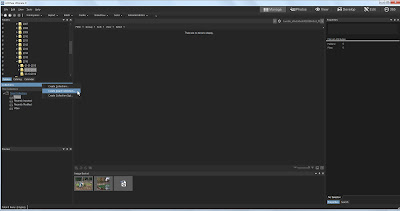 The first thing we need to do is right click on the Collections bar in the collections window (See the screen print below). From the drop down menu, select "Create Smart Collection" When you have done that, the creation window appears.
What you do with this window should be intuitive, plus it pretty much looks like the saved search window.
Below, is how to fill out the fields in such a window:
Name: This should be the name of the smart collection you are creating. In the example below, I have yet to type in the name of the Smart collection. It should read, "E-M10 Photos that have been cropped", but sadly, I neglected to do this.
Location: If you check the "Inside a Collection Set" Check box, you then need to specify the collection set under which your new smart collection will reside. You don't have to do this right now, since you can create the Collection Set later and then drag and drop the collections to rearrange them later. But you can do that at this point if you want to.
Match: This is where you describe the search criteria. Click on the "Add" button and a list of virtually every attribute that the ACDSee supports will appear. Select attribute that you want to search on and it appears in the window.
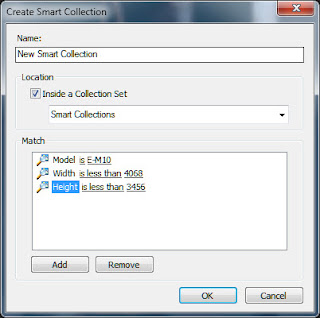 You will note that if you click on the word "is", a drop down selection menu will appear giving selection logic options. The exact search criteria options will vary according to the metadata field you are searching on. The search criteria logic list is:
- IS
- IS NOT
- IS LESS THAN
- IS LESS THAN OR EQUAL TO
- IS GREATER THAN
- IS GREATER THAN OR EQUAL TO
- IS BETWEEN
- IS ANY OF
- CONTAINS
- STARTS WITH
If you click on the "0" after the "IS" Then a text box will appear allowing you to specify the value you want the search criteria to look for.
I find the "IS ANY OF" particularly useful in that it will allow you to select a series of values separated with commas.
You can add as many of these "Match" clauses as you want. However, all multiple 'matches' will be considered 'AND' logic. there is no "OR" logic, and no "AND IS NOT" logic linking the series of match clauses (though that logic may be allowed within the search clause itself). You can eliminate and identify groupings within the Smart Collection results in the Filter menu above the Smart collection results.
How I found my 'Cropped Photos'
I now shoot a micro 43s camera called the Olympus E-M10, and I shoot raw mostly. So I know that the uncropped size of my camera's raw image is 4068 pixels wide by 3456 pixels wide. If I want to find the photos that are cropped, I know that the width has to be LESS than 4068 pixels wide, and the Height must be less than 3456 pixels high. if they equal those sizes, they are not cropped.
Now the problem is I've shot with a Canon G3 in the past and my wife's cameras as well and those tiny sensors make pictures SMALLER than the m43s image (in terms of pixel size). And the problem with that is THEY will all be included in the dimension criteria whether they are cropped or uncropped, because their default size is something less than the larger m43s size. So I need to also specify that the model name stored in the data base to exclude those cameras from the search.
If I want to find the cropped photos from the other cameras as well, I need to figure out what the default image sizes for those cameras are and create a Smart Collection for them, and store them in the same collection set as the one for my E-M10.
To find those that have only been cropped for the width, but not the height, I would also have to create searches for the specific camera and only specify the width parameter but not the height, and place them in my cropped collection set.
Then to find all the cropped photos I have to run each smart collection individually, select the results from that Smart collection and manually place them in a regular (i.e. "dumb") collection common to all the related smart collections. It can be a bit of a hassle to do that process 3 or 4 times to compile a collection of all cropped photos. This is why ACDSee needs to figure out a way to automate running all the smart collections in a set and treating them as a single common result set.
On the whole, while smart collections have their faults, I would estimate that more than 80-90% of the time, the way smart collections are currently configured, the user will have no problems getting what he or she wants from them. However, that last 10% or so is going to prove problematic.
Thursday, March 24, 2016
Can a Tablet Replace a PC for Photography?
The Problem
Lately, I've had to travel a bit to Texas from Illinois, in the USA, for family reasons. And it has occurred to me that while a Desktop PC is a wonderful tool for processing and presenting photos, it makes for a terrible travel companion.Laptops have been the traditional substitute for travelling photographers, but they have problems of their own. The ones good enough for photography, are heavy, HEAVY! If you've ever had to run from one terminal at O'Hare airport in Chicago to a distant terminal in 15 minutes, you will know exactly what I mean. I won't even discuss the problems of short battery life and screen calibration.
The funny thing is, I really don't need all that laptop processing power when I travel. I rarely have time to do any sort of editing of my photos during that time anyway. I'm lucky to have the time to save the contents of my media card and cull the terminally bad photos. I might do a quick edit and share of a photo with family, but my REAL processing still waits until I get home to my digital darkroom set up. What I need is a sort of coordinating software/hardware hub for my travel photography.
So it has occurred to me, along with millions of others, that a cheap Android tablet, while not a perfect travel companion, might be at least as good, if not better, than a heavy laptop with its OWN set of travel problems. However, whenever I see this issue brought up on various photography websites, the general consensus is that this is a bad idea. The tablets are underpowered, the memory anemic, and the upload to online storage is abysmally slow.
I have felt great frustration at this information. I hate travelling with laptops, but I didn't see a viable alternative. Then one day I realized that I was accepting this general consensus without doing any investigation of my own. I had become sheeple! I hate being sheeple.
So I set out to see if I could get away with using an Android tablet as my photo hub.
Software Choices
I own a very generic, first generation Lenovo Idea Tab A10 - 70 with 16 Gig of memory and a micro SD expansion slot along with MediaTek MTK 8121 1.3 GHz quad-core processor. It has a 10 inch screen, and uses Android 4.2 (Jelly Bean) OS. It supports OTG USB accessories (pretty common, anymore); and I hasten to add that this is not the upscale Lenovo Yoga tablet. This is a very common, mid tier, name brand, generic tablet. I paid about $180 USD for it, and a matching USB keyboard that doubles as a cover for travel.The first thing I looked for was software. I discovered there was a lot of what I call "toy" photo apps. Things that allow adolescents to add 'cool' filters to photos taken with smartphones, but not much for the serious photographer using a tablet I did find two titles. Lightroom, and Photo Mate R3 that looked interesting to me.
Lightroom had the advantage of being free, but it did require that I convert my raw photos to dng, which would be a significant alteration to my digital darkroom practices when I got home. I don't really WANT the dng file format as I like how my orf files are handled by ACDSee on the PC. And while Lr doesn't really REQUIRE you to subscribe to the Adobe online environment, it's effectiveness is really enhanced by that subscription, and I wanted to use either my grandfathered in "50 gig free for life" subscription to Box.com or my other paid for, Amazon photos subscription.
Photo Mate cost $10, but it did not require a conversion to dng, and it allowed me to upload files anywhere I wanted. Plus it offered a remarkably complete editing environment, including layers. I thought the cost was acceptably low especially when compared to what I paid for PC based photo tools. So I bought it and I don't regret buying it.
Photo Mate is not perfect however, Using it to edit photos on a 10 inch touch screen is kind of difficult. My fat sausage fingers did not offer the sort of fine control that a mouse can offer. (more on this in a bit). Also there is a bit of a lag between the change in a control and the time it takes to display that change. Clearly, a faster processor and higher spec'ed tablet would make it run faster. I think it is obvious that PhotoMate is held back by the technology currently found in low to mid level tablets.
Fortunately, my editing needs on Android are pretty simple, so the auto enhance feature is really all I need to edit a photo to a point suitable for sharing it with family. I find the lag acceptable in this case.
Also, while Photo Mate does an excellent job of managing a single photo, it's rather weak when managing a batch of photos. I tend to use the Box.com android client app to transfer photos to Box. it's better and faster, but I DO wish Photo Mate could do that for me!
Could I have used something OTHER than Photo Mate for my limited editing needs? Probably, but it offers an almost unlimited editing and raw development pallette. For just $10 I know I can handle just about anything fate tosses my way when I travel.
I have also found that the Lenovo File browser useful at times for batch file manipulation. There are several file manager apps available in the Google Play Store if your tablet doesn't come with a native file manager, or if you don't like your existing manager.
Hardware Choices
 Once I had my software selected, I needed to figure out how to get my photos from my camera to my tablet. My Tablet doesn't have an SD card slot (though it does have a micro SD slot), so I can't just move the media card from my camera to my tablet. My camera (Olympus E-M10) can upload jpgs to my smartphone via the Olympus Image Share app on my phone. But I want to shoot raw, and OIS is kind of slow anyway, I needed a better way to get my photos directly into my tablet.
After some research and some kind advice from others, I knew that an OTG USB hub was the way to go. basically it allows one to connect what appears to be a combination of USB hub and media card reader to the tablet via the mini USB port most Android tablets use to charge the battery.
I bought one from Amazon.com. It's a no name generic, I THINK. The brand might be Costech, but I'm willing to bet the thing sells under a variety of vendors at a variety of prices. I believe I paid around $12 USD for it.
This is an interesting device in that you can connect a conventional USB Mouse and Keyboard to the tablet via the hub. I admit, I haven't tried a USB mouse with this, even though it might make editing photos with Photo Mate easier. I have been reluctant to use such a mouse because of power draining issues with the hub. I've seen bluetooth mice advertised, and I'm thinking that might be more useful to me overall for editing than a hub based solution.
When you use this hub, you need to make sure the tablet's battery is fully charged since it uses the mini USB port for access eliminating your ability to power the tablet while in use. There is a USB power cable that comes with the hub, but it seems to power only the hub itself preventing the tablet from having to power the hub. When connected, the tablet doesn't indicate it is receiving power by displaying the charging symbol. Fortunately, you only need to have the hub connected for the transfer of files, once the photos are safely in your tablet you can disconnect the hub and reconnect the power supply to the tablet.
My Workflow
- I connect the Hub to the tablet and insert the camera's SD card into the hub.
- I use the Lenovo File Browser app to select and move the photos to a special folder on the micro SD card permanently installed on my tablet.
- I disconnect the USB Hub from the tablet
- I use Photo Mate R3 to browse the photos and cull obvious photos that I know I will NEVER want. (Though I do tend to keep everything).
- If there are photos I want to share with people immediately, I edit them via Photo Mate, convert them to jpg, and upload them to whatever sharing location I have selected. I could print, if I wanted, and have access to a wireless printer and an appropriate network.
- I upload the orf files and any edited conversion files to Box.com via the Box.com client app. When I get home, I will then download those files to my hard drive. Once I am certain my photos are securely uploaded to Box, and I will not need to edit them further, I feel free to delete them from my tablet. I haven't decided yet if I will delete the stored online photos once I download them to my HD at home.
My Performance Analysis
Performance, while not spectacular, is better than I expected. This is NOT the equivalent of a PC connected to a wireless LAN, but I do believe it is an acceptable compromise for those times when I am travelling.
I downloaded 431 mostly orf files that combined, totaled 6.3 gig. Individual photos ranged in size between 12 and 20 mb in size. The transfer time to to the tablet from the SD card was 40 minutes long, the power remaining in my tablet's battery went from a 100% charge to roughly 89% in that time. The screen did black out during that time, but that did not stop the transfer.
The upload of the 431 images to Box.com took around 50 minutes. There was no need to track battery power usage, since at that point I had placed the tablet on the external power supply.
I found that I prefer Box.com to the Amazon Photos, or Google environments for uploading to online storage. The upload speed wasn't really any faster, but both Amazon and Google required that I manually select each and every file individually, while Box.com allowed me to select ALL the photos in the folder. In a batch of 300 - 400 photos, this is a significant savings in time overall.
Photo Mate has a benchmark utility to assess your particular tablet and make set up suggestions for Photo Mate. However I found the results confusing. The scores delivered in text format don't seem to correlate to the graph that comes with it. The text results indicate my tablet is one of the slowest tablets ever. But the chart sort of indicates it is the fastest. I suspect the chart needs updating. At the very least it needs to be reviewed for clarity and ease of understanding.
The utility recommended that I set Photo Mate's preview quality to low, and the raw decoder quality to fast (bilinear). I tried all those sort of settings, but I saw no difference in my response time. I suspect I could use a better set of tablet specs!
So, what's the verdict for me? I think I'm going to continue using my tablet for this purpose, I like being able to upload my files to Box so I can clear my SD card for the next day's shooting (If I can find the time for more shooting, that is!). And I REALLY like not having to carry a laptop around with me.
Yeah, it's slow, but I can schedule the tasks for during the night or other down time, so I don't have to be around or awake when it is happening.
Yeah, it's slow, but I can schedule the tasks for during the night or other down time, so I don't have to be around or awake when it is happening.
Tuesday, October 13, 2015
An ACDSee User's Perspective on DXO Optics Pro 10
 |
| A Good Tool |
Actually I liked it pretty well. I was particularly impressed with the CA/Purple fringing control. And, the auto correction tool shows a maturity that ACDSee Ultimate 9, which just introduced auto correction, simply doesn't have yet.
Lots of lens and camera combinations in the DXO lens correction database that ACDSee doesn't have. Especially in the area of Olympus 4/3s DSLR lenses teamed up with m43s cameras. This will improve, I'm sure, when ACDSee comes out with the infrastructure on how to add lenses to the database ACDSee is using.
The image quality of the finished product was quite high, however I am used to a more minimalist approach to the raw development software automatically adding in auto sharpening and noise control whenever an image is accessed via the program. DXO made some things too crisp and sharp, I thought, for images that already had sharpness and NR already added. I found myself backing that stuff out a bit on those sort of photos. Not a major issue to be sure, but it was one of those minor irritants I could get used to if I had to.
You need to remember, DXO is a pure raw converter, that means there is NO database or DAM management tools built into it. So you will need some sort of front end to handle that sort of thing. I should think that if I were to use DXO, I would use ACDSee 19 (Their basic viewer/DAM software) instead of Ultimate, though Ultimate 9 worked well enough during my testing.
Overall, however, I don't feel DXO offered me enough reasons to incorporate it into my workflow. Image quality was VERY good, but so is ACDSee Ultimate 9's IQ. And by staying with one vendor from import to organizing, to raw development, to bit mapped editing, and then to distribution, I have a single set of color control tools at all times and most importantly, a single user interface. To me, the idea of a consistent user interface is a major productivity asset all by itself.
In summary, I think DXO is a fine product. I could recommend it to someone who is dissatisfied with their current processor so long as they understood that they would have to provide a separate DAM tool and bit mapped editor for a complete workflow set up.
Monday, September 28, 2015
On Using the ACDSee "Photos" Tab
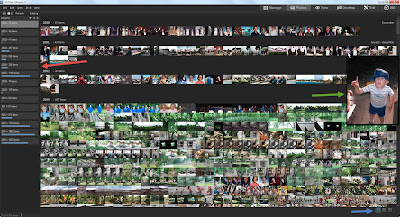 It's purpose is to display the contents of your entire photos database by date regardless of the folder structure, This may prove useful if you know a photo exists, but you simply DON'T have enough information to search for it in a traditional manner. It may also prove useful for those involved in commercial photo management.
Also, for those who don't want to maintain a folder structure other than one big, high level, folder into which ALL photos get dumped regardless of if they are ready for showing or not, this will likely prove VERY useful.
This feature requires no set up to use, it is fully functional upon installation of one of the three ACDSee software titles. The date that seems to drive this feature is The Exif field called "Date/Time Original" Not "Created Date" or "Date Digitized", or "Modified Date".
Remember the "Date/Time Original" date time stamp is editable from within ACDSee, so if photos aren't showing up in the order that you think they should be, you can change that date to suit your needs. I have found that sometimes a "round trip" to an external editor can really get metadata messed up. For me, Paint Shop Pro X6 can strip a lot of existing metadata from a photo and can cause a lot of trouble. So if you use external editors, make sure they aren't ruining or changing your metadata.
A Tour of the Photos Tab:
Next to the RED arrow on the left, is the dates field this will display the dates on which the photos in your database will be sorted. If you click on a date in that field any photos with the Date/Time Original date on or after that date will be displayed. For the Annual view, only year dates will be displayed, For the monthly view, only Month and Year will be displayed, and, of course, for the Daily view the entire year ,month, and day will be displayed.
With the annual and monthly views, I have found that the displayed thumbnails are so small that they are difficult to actually SEE! So note the GREEN arrow next to the photo of the little boy with his hand in the air. When you roll your mouse cursor over a given thumbnail image, that image will be enlarged to a usable size.
Also, the default viewing size will get larger as you move down the time scale of year, month, and day. So it will be easier to see the day displayed photos than it will be to see the year displayed photos.
I have found that for me, a usable work flow for this new tab is to start with the year only search, and then once I think I have the year identified, I then view the photos in that year by month, and if necessary then by Year, Month, and Day. Note the BLUE arrow at the bottom right of the screen. The three grey icons allow you to change the view from annual to a more granular date.
However, I've discovered this is not the most useful way to change the date view! An R-Click of the mouse anywhere in the thumbnail display window will change the view to the next most detailed date. So if I am in the Year display view, and I do an R-Click, then the display will change to Year, Month display, and so on.
Also, at the top of the date display window on the left are two arrows one pointing left and one pointing right. They will change the date view as well.
Set Up Controls:
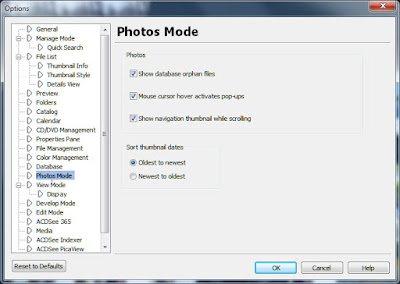 There are some limited set up options available to the user for modifying the behavior of the Photos Tab. See the Screen print on the left.
Show Database Orphan Files
This option allows you to tell the photos tab to include any photos in the database, that point to a location that no longer exists. Photos can get orphaned this way if you delete a folder containing photos using Windows Explorer or some other application that is not aware of the ACDSee database.
Mouse Cursor Hover Activates Pop-ups
This option allows you to prevent ACDSee from showing you an enlarged thumbnail if you so choose. I wouldn't want to do this, but everyone is different in this regard.
Show Navigation Thumbnail While Scrolling
Frankly, I'm not sure WHAT this thing does! The ACDSee Ultimate 9 help files says that it
"Activates or deactivates the animated pop-up navigation thumbnail, which displays the date on the thumbnail during scrolling. This option is to assist with orientation for users scrolling through large photo collections."
Maybe this change is so subtle, that I am confused by it, or maybe it's only useful under certain situations, but I don't see any difference in behavior, and the help file isn't all that helpful, in this case. Use it if you want, I guess.
Sort Thumbnail Dates
Allows you to select the sort order of the thumbnails
All in all, now that I've had time to use it a bit, I think this will have some use for me. I am not the worlds greatest folder infrastructure maintainer, and sometimes photos get moved to folders that they have no business being in, and I have had trouble finding those photos. (I consider it a sign of brilliance) I have wished, several times, that I could view ALL the photos in the database regardless of folder structure. This will allow me to do that.
I would advise other users to not dismiss this new functionality out of hand. I think that the terminally sloppy photographer, and the compulsively neat photographer will both find this useful and a comfort.
Friday, September 25, 2015
An Experienced User's Notes on ACDSee Ultimate 9
Well ACDSee, the company released ACDSee Ultimate 9 yesterday. It is, in my opinion, a major upgrade to an already mature and well seasoned product line. This won't be a review, as such, so much as a comment on the overall effectiveness of ACDSee Ultimate 9 and some comments on specific new features.
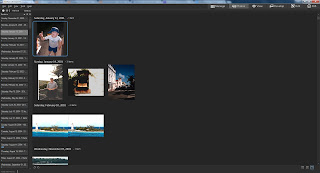 Allows you to view entire photo database regardless of location on the hard drive or in other logical ACDSee constructs. On the Left of the screen is a narrow window of dates on which photos were taken, And on the right, a much larger window that displays all the photos taken on, or after, that date. So, in effect, you can see your entire collection of managed photos, or a subset of photos that were taken AFTER a specific date.
No product is 100% perfect, and neither is any product in the ACDSee line. But Ultimate 9 seems to me to be a welcome upgrade in my eyes.
Some background on the three major products in the ACDSee line of software that sprung from the original ACDSee viewer Browser that originated in the 1990s. Note that ACDSee sells other products as well. These are not the only products ACDSee offers, however these are the products I most care about.
There are three products in this line, the current versions are:
- ACDSee 19 - This is no longer the basic photo viewer/browser of the early years. It is a full featured media manager and media database application. It not only allows for some pretty sophisticated management of your photos, it also allows for the simple 'touch-up edits people have come to expect with this sort of product. Actually, when I downloaded this product, I was surprised at how sophisticated the 'Edit' tab controls were. For instance, I could even blend the unedited exposure version of a photo with the edited exposure version! I would say, for the jpg shooter who is more of a shoot and post on social media person, but who wants to be able to touch up and crop photos, and then track how they get used, this may be all they need.
- ACDSee Pro 9 - This adds Raw development and a slightly more sophisticated bit mapped editing capability to the manage functions of ACDSee 19. In fact it looks like ACDSee 19 is lifted whole cloth and inserted into Pro 9 I don't see any significant difference between the Manage tab of ACDSee Pro 9 and the Manage tab of ACDSee 19. I won't go into detail on the differences between the two products, ACDSee has a web page that explains the differences. This first part of the article is a summary, but there is FINALLY, X-TRANS support! Finally! The Edit tab has some additional enhancements that most people will want as well. This includes Pixel targeting, trust me you want Pixel Targeting!
- ACDSee Ultimate 9 - Essentially this is ACDSee Pro 9 with the addition of an enhanced Bit mapped editor with layers.
If you see a pattern where each level of software builds on the features of the one that comes before it and then adds features, you would be correct. They all use the same database and the same user interface. Learning one product gives you most of the skills you need to successfully use a different product. You most definitely do NOT have to forget something to upgrade to a different and more sophisticated product.
But let's review ACDSee Ultimate 9. This is the top of the line in this series of software. It costs the most, but it does the most. I have listed below what I consider the major enhancements. some of them are in U9 only, while others are also in ACDSee 19 and ACDSee Pro 9. I won't attempt to tell you which functions are in which product. ACDSee has a web page that does that quite well.
My goal in this article is to give you MY impression of the new features of Ultimate 9. Please do not consider this a formal review, mainly because I haven't spent enough time with the product to render a final judgement (AS I write this, the software was released the day before), and also I don't like final judgements on software since the review is of.a product at a particular point in time.
The reviews rarely change or get updated, but with software upgrades, the software does, often rendering, the review less accurate than at the time of publication, but the reader has no way of knowing how accurate that review remains. I want to avoid that problem as much as possible, so I consider these an independent, third party, set of release notes for the initial release of ACDSee Ultimate 9. If you MUST think of this as a review, think of it as a brief review of functionality.
Below are the major new features that I think most people will be interested in. I will discuss them individually.
X-Trans Support
Well, it's about time! Most current X-Trans users have already selected their raw development software by now. So if ACDSee wants them to consider switching, the quality of the X-Trans conversion must be at least as good as they currently are getting. I can't comment on the quality of the conversion itself, since I shoot m43s. If any X-Trans users want to download a trial version, and let me know their opinions, I would be happy to publish their comments.
Adjustment Layers
This is a major feature upgrade for Ultimate 9. The ability to mask and apply adjustments to layers in Ultimate 9 takes the layering function of Ultimate 8 from a handy convenience feature to a significant workflow tool.
Automated lens corrections (Geometric and CA)
Again, this is really important. It was frustrating to know that my m43s system embedded distortion data into the image but that ACDSee couldn't access that information. And manual correction was fine for gross obvious distortion, but pretty useless for more subtle correction.
It appears that ACDSee is using the Lensfun correction database, so if a particular lens profile offers CA data, then ACDSee will offer CA correction as well. If they are using LensFun, then a simple internet search will yield all sorts of ways to create Lensfun profiles for lenses using tools many people now have. I even found one that uses the open source stitching tool Hugin.
However, what we need from ACDSee is clarification of, will they use a different, more proprietary, process to create new lens profiles and insert them into ACDSee; or will there be a more generic, process created? I'm sure this announcement will come in time, the new release has only been out one day at this point. I suspect they are now waiting for any errors and omissions to pop up so they can fix them ASAP.
Snapshots (Virtual copies)
This does not appear to be an exact one for one replication of Lightroom's Virtual copies where the database stores and displays a thumbnail of the revised image and search and select the Virtual copy as if it were an independant photo. Instead it allows the user to save the Develop tab's, development setting and give it a name without creating a new thumbnail for that setting. The Snapshot defaults to a datetime stamp as a default name, but clearly, more meaningful Snapshot names would be useful to most people. Changing the default name is easy enough, so I urge users to do so.
Is this as useful, overall, as Lightroom Virtual copies? No, it is not, though it is still VERY useful. However I would remind you that ACDSee uses what appears to be a hierarchical database as opposed to Lightroom's Relational database. Hierarchical databases require a different record access methodology than Relational. This alters significantly how the programmers must code their program. Relational databases get their powerful flexibility at a price of speed though. For those who don't like Lr's speed and response time, this may prove a most satisfactory alternative.
Action Recording and Playback
This works only in record mode in the 'Edit' Tab; and in playback mode, in the Manage and Edit tabs. It does not work in the Develop tab at all, though I can see some valid uses for it in the Develop tab, maybe Version 10 or 11 will offer this feature.
Overall it works pretty well, you select 'record', perform an action or a series of actions in the Edit Tab, then you hit "save", give the recorded action a name. After that, you can bring up any photo, or a Batch of photos, in either the "Manage" tab or the "Edit" tab and apply the same actions to all those photos in the order recorded.
Presently, there is no way to edit a recorded action. If you spot an error in the recorded action file, you will need to delete that action file and create an entirely new one. Again, a nice addition for subsequent versions, I guess.
PS Plugin Support
I find this VERY useful, I no longer have to treat Plug-ins as standalone editors or avoid using those plug-ins that can't function as a stand alone editor. So far, I can only confirm that it works with 64 bit plug-ins, so favorite 32 bit Plug-ins might not work.
EDIT 9/30/2015:
In a private conversation with another ACDSee user, he reports that he has successfully run Polaroid Dust and Scratch remover and Kodak ROC inside of ACDSee Ultimate 9. I want to make sure I correct any misconceptions I may have left.
EDIT 9/30/2015:
In a private conversation with another ACDSee user, he reports that he has successfully run Polaroid Dust and Scratch remover and Kodak ROC inside of ACDSee Ultimate 9. I want to make sure I correct any misconceptions I may have left.
Collections/Smart Collections
I haven't played with this function much, but my feeling, so far, is that it will be quite useful. While the user interface differs pretty much from Lightroom's version, the actual concept and process pretty much works the same way. Basically you create and name a collection and then select a group of photos right click on them and add them to the desired collection.
Smart collections seem to have a search function added to them. At this point I haven't really used the Smart Collection feature. If I find it particularly useful or poetentially useful I may write an article specifically on this topic.
Photos Mode
 Allows you to view entire photo database regardless of location on the hard drive or in other logical ACDSee constructs. On the Left of the screen is a narrow window of dates on which photos were taken, And on the right, a much larger window that displays all the photos taken on, or after, that date. So, in effect, you can see your entire collection of managed photos, or a subset of photos that were taken AFTER a specific date.
I'm not sure I will use this much, but I suspect people involved in commercial photo management will find it useful.
Dehaze
Is this a fad for the software publishers or what? It seems every publisher is adding a dehaze slider. What does this do that can't be done with other tools? Well I tested it out, and when compared to other techniques,where no other conditions needed to be met, it is a tiny bit better than I could do on my own.
Skin Tune
I would point you to my comments on Dehaze. Though as a landscape and nature photographer, I don't really use this sort of 'glamour' effect all that often, I have tried it out and I find it acceptable for my limited needs, and I suspect most other people will find it useful as well.
4K support
It's there if you need it. I have no way to test it out.
Lightroom Database conversion
I haven't tested, I got rid of my Lr database some time ago. But I suspect it does NOT Convert your Lr edits, but is more about metadata conversion issues. That in itself, is not small potatoes, and may make it easier for Lightroom users to switch to ACDSee from Lr. I wish I had it 3-4 years ago when I switched from Lr.
Summary
All in all, I would say this Windows only application has had a serious upgrade in functionality. ACDSee Ultimate 9, still has some obvious gaps in what I think I need in an ideal photo tool, but on the whole, I like it very much. I like it better than Lightroom, primarily for its speed of operation, and the Light equalizer (see my previous article here). However, these, functionality enhancements really seal the deal, in my mind. Of the new functions, I think I will use the adjustment layers, the Snapshot functions, and the Photoshop Plug-ins feature the most. But the exciting thing is, I don't know with absolute certainty! One of the other new tools might surprise me.
Labels:
4k support,
ACDSee,
Actions,
Collections,
Dehaze,
Hugin,
Layers,
Lens Correction,
Lensfun,
Lightroom,
Photo Editing,
Photos mode,
Photoshop,
Plug-ins,
Plugins,
SkinTune,
Snapshot,
Virtual copies,
X-Trans
Tuesday, June 2, 2015
Reverse Geocoding with ACDSee!
I just attended an ACDSee sponsored Webinar regarding "Image Management In The Corporate World." I don't know why I was invited, since I am DEFINITELY an amateur when it comes to photography. My name must have cross 'contaminated' some mailing list, I guess. However it happened, I hope it happens again!
But I'm glad I did attend. I learned a LOT about Image Management in general, and the ACDSee products in particular.
And one of the things I learned about was ACDSee 18 and its ability to set the geo codes in the EXIF long after the photo was taken. Actually, it works with ACDSee Pro 8 and ACDSee Ultimate 8 as well.
The quick explanation is that ACDSee can use Google maps to attach a location to a given photo, then at the click of a button look up the geo code information on Google maps and insert it not only into the EXIF data, but place the conventional street address into the IPTC data as well.
I tried to duplicate this in ACDSee Ultimate 8 just to make sure it works, and it does! This sort of thing may work with photo management software other than ACDSee, but these are the tools I use and care about, so you might want to pay some attention to the more obscure tools in your favorite software.
Here is how I did it. As Always with Blogspot, you can click on any picture to make the photo bigger.
Above, I selected a photo to add geocodes
to. Then I right clicked on the photo and selected "Map|Place on Map". I could have just as easily selected tools from the menu at the top, but I didn't.
A window appears with Google Maps displayed, zoom in on the location where you recall that you took the photo. The little bubble pointer will allow you to see where the location was placed. Once you have the pointer placed the way you want it, then click on the button called "Reverse GeoCode".
A pop-up window appears confirming your placement. If it is correct, click "Save".
Note that the Geocode appears in the EXIF data. Also note below that the conventional street data also appears in the IPTC data.
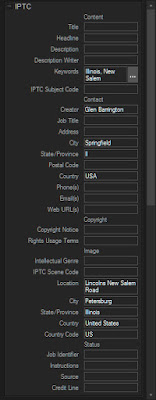 Now, not everyone will likely want or need this functionality, but for those who do, this will be a great convenience for them. I don't always need this sort of information. But when I do, it's a real pain to recreate it after the fact. And while I may not really want the actual geocode when a simple street address might do, as I recall the webinar speaker claimed an an accuracy to within 3 meters. I should think this would provide a lot of functionality for many people!
Saturday, May 16, 2015
Getting that Old Faded Photo Look - A Tour of Tone Curves In ACDSee Ultimate 8
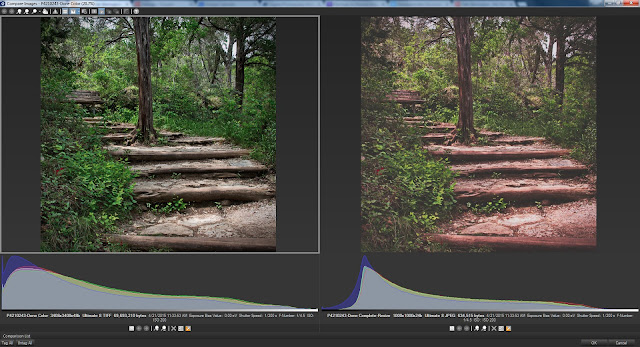
This is a quick tutorial on how to recreate that washed out, 1960's Old Color Photo look by using the Tone Curves control found in ACDSee Ultimate 8 or in ACDSee Pro 8. Please note that any image in this tutorial can be 'clicked on' and the image will be enlarged.
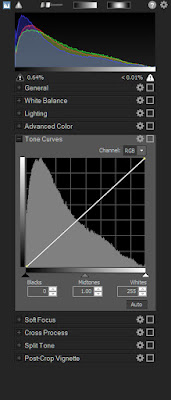
First, A Guided Tour of the Tone Curve Control.
Coincidentally, this tutorial is also a pretty good explanation of the Tone curve control found not only in the ACDSee products, but in almost every other photo editing product on the market.You know, we often see on various photo web sites newbies posting someone else's photo that emulates this look and then asking, "how did they get that look?"
And, often times more experienced users will point to various add on programs to do this thing and then the newbies go out and buy that new software, when in all likelihood they not only already have the means to do it, but they also have the required skills to do this without spending any extra money whatsoever!
The truth is, that just about ANY software that has a tone curves control can replicate this look very easily. That means if you own Photoshop, Photoshop Elements, Lightroom, ACDSee Pro 8 or Ultimate, Paintshop Pro, Gimp or a host of other photographic software, this look is already well within your means and skill level, no matter how much of a newbie you are. So lets get started, and explore this technique.
To the Right and above,, is he tone curves control in the ACDSee Ultimate 8 Raw development tab. It has all the conventional functionality found in most tone curve controls and a few things added to make it more useful for raw development processing.
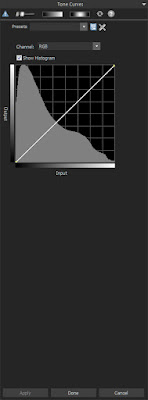 To the left, is the tone curves control found in the ACDSee Ultimate 8 Edit tab. It too has all of the conventional functionality found in most tone curve controls but without the raw development considerations of of the Development tab.
 Now, the question as to why there are two separate tabs in ACDSee that offer many of the same controls is beyond the scope of this tutorial. At this point, let's just say that some photographers who use jpg and tif based photos sometimes find it easier to deal with them without having to worry about the raw development tools complicating their choices.
For this tutorial, we can use either, or some other software completely, for that matter, and it won't make much difference. I personally prefer to use the Development tab controls whenever possible,
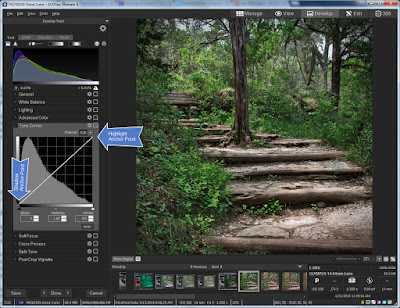
Before we get involved with the changes we intend to make, lets first discuss the controls we see in the tone curve control group. The first, most obvious, is the curve display itself.
Note there are two default anchor points on the diagonal line that represents the tone curve.
As in a live histogram, the left side of the tone curve chart represents the shadows, while the right side of that same chart represents the highlights, and of course, the area in the middle is what we call the mid-tones.
But in the typical tone curve control set up we also have the luxury of moving those control points and any control points we subsequently create, up and down as well as left and right. If we are trying to control lighting, the up and down movement controls how light or how dark those shadows, mid tones, and Highlights are.
Also remember that if we are trying to control the intensity of one or more of the color channels, that is, the Red, Green, or Blue channels which make up ALL of the other colors we see, that up and down movement of the control points controls color intensity.
Note the little Drop Down box next to the word “Channel:”. There are 4 options, "RGB" which combines all 3 channels into a single brightness channel, and then an “R” for Red, a “G” for Green, and a “B” for Blue. These three primary colors combine to control every color available in the photo!
With these channels I can tell the Tone Curve Control to adjust brightness in specific areas of the chart, or by individually controlling the level of color intensity for each channel, I can control the tinting and shading of all the colors
Lets play with the up and down and left right movement a little bit. Note that when I grab the default shadow and move it up towards the top of the chart, while leaving it at the furthest left most horizontal position, the photo gets a little washed out.
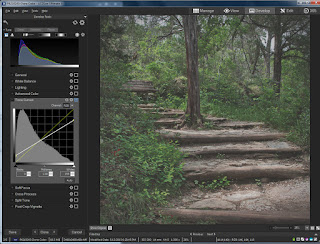
That's because I'm saying to the editor, "Hey editor! I care about ALL the shadow that is in this photo, however I don't want the blackest part of the shadow to be as dark as it is! Lighten things up a bit for me will you?"
Now when I leave the shadow anchor point alone but move the Highlight anchor point DOWN, notice that the contrast goes down compared to what it was. Thats because we are telling ACDSee Ultimate 8 that we want the highlights to be LESS bright.
Let's try one more thing, move the shadow anchor point to the right. Note the odd situation of a sort of dull High contrast combination. This is because moving the Shadow anchor point to the right tells ACDSee Pro 8 (or Ultimate 8) that we only care about the shadows to the right of the anchor point. ACDSee will only do its best to display detail reflected to the right of the anchor point. Everything to the Left of the anchor point is allowed to full black.
Let's have a little logic test. What do you think will occur if we move the highlights Default anchor point to the LEFT?
If you answered that the contrast would go up, then you would be correct. The reason is, that We are telling ACDSee Ultimate 8 (or Pro 8) that we only care about the highlights to the left of the Highlight anchor point. ACDSee will only protect the detail to the left of the anchor point and allow the highlight detail on the right of the anchor point to display as WHITE.
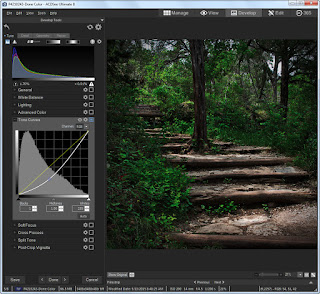 But of course, as I mentioned earlier, We can create our own anchor points. Let's reset the Tone curve controls to their original default setting. We can do this by clicking on the little 'gear wheel' in the Tone curve window which resets only the tone curve controls; OR clicking on the larger 'gear wheel' at the top of the screen. This wheel resets ALL controls, not just the tone curve controls, to their default settings. In this particular case, either window will work for us, since the only changes we have made are to the tone curve controls.
 To create a Tone curve anchor point, merely click on any point in the Tone Curve chart. You can click on the default curve line itself and drag it to the location you want, or you can click on any area of the chart and the curve will adjust itself to to where ever your cursor is pointing.
 You can do this with the Channel called RGB, which is effectively the brightness channel, Or you can select either “R”, “G”, or “B” and adjust them manually.
Now this is pretty much the operational theory behind the various Tone Curve controls for almost every software package on the market. If you understand what we've done so far, You should have very little trouble using any Tone Curve control you encounter.
How to achieve that 1960's, Washed Out Old Photo Look.
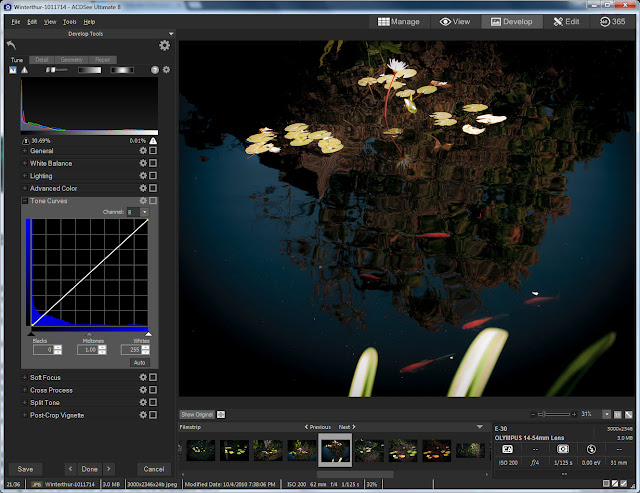 Now let's do something practical! AS promised I will show you how to recreate that washed out look so popular right now. And best of all, it is SUPER easy, and super FAST. Best of all, you don't have to buy any additional software if you already own software with a tone curves control. I'm bored with the photo we've been using, let's try something else.
First, lighten the photo, so the deepest blacks are washed out a bit.
I notice that while I like how the blacks are pleasantly washed out, I don't particularly like what it has done to the contrast overall. I think much of this photo's dynamic comes from contrast. But by experimenting, I realize that pulling down the mid tones changes the balance of contrast and I don't want that.
What I want is to add back at least part of the 'pop' that comes from contrast without getting rid of the washed out look of the shadows. So I then created a new control point a bit past the mid tones and pulled the curve up a bit. This allows me to have a washed out look with a bit of pop in the contrast.
This is almost right, but we really haven't accounted for the slow deterioration of the color dyes in an old photo. As a result, I brought up the Red channel a bit. If you so chose, you could replace Green with Red, or combine Green with Red to go with a more yellow look, if you so chose. That's a question of your artistic judgement.
That's it! This short tutorial has not only given you a guided tour of ACDSee Pro 8 and Ultimate 8's Tone Curves control, but gave an example of how the control can be used for a specific effect. I hope you have found it useful.
Subscribe to:
Comments (Atom)


